How To Go About Planning A New Bathroom, Regardless Of Who You Get To Do The Work…..
Introduction
Bathroom ready to renovate:
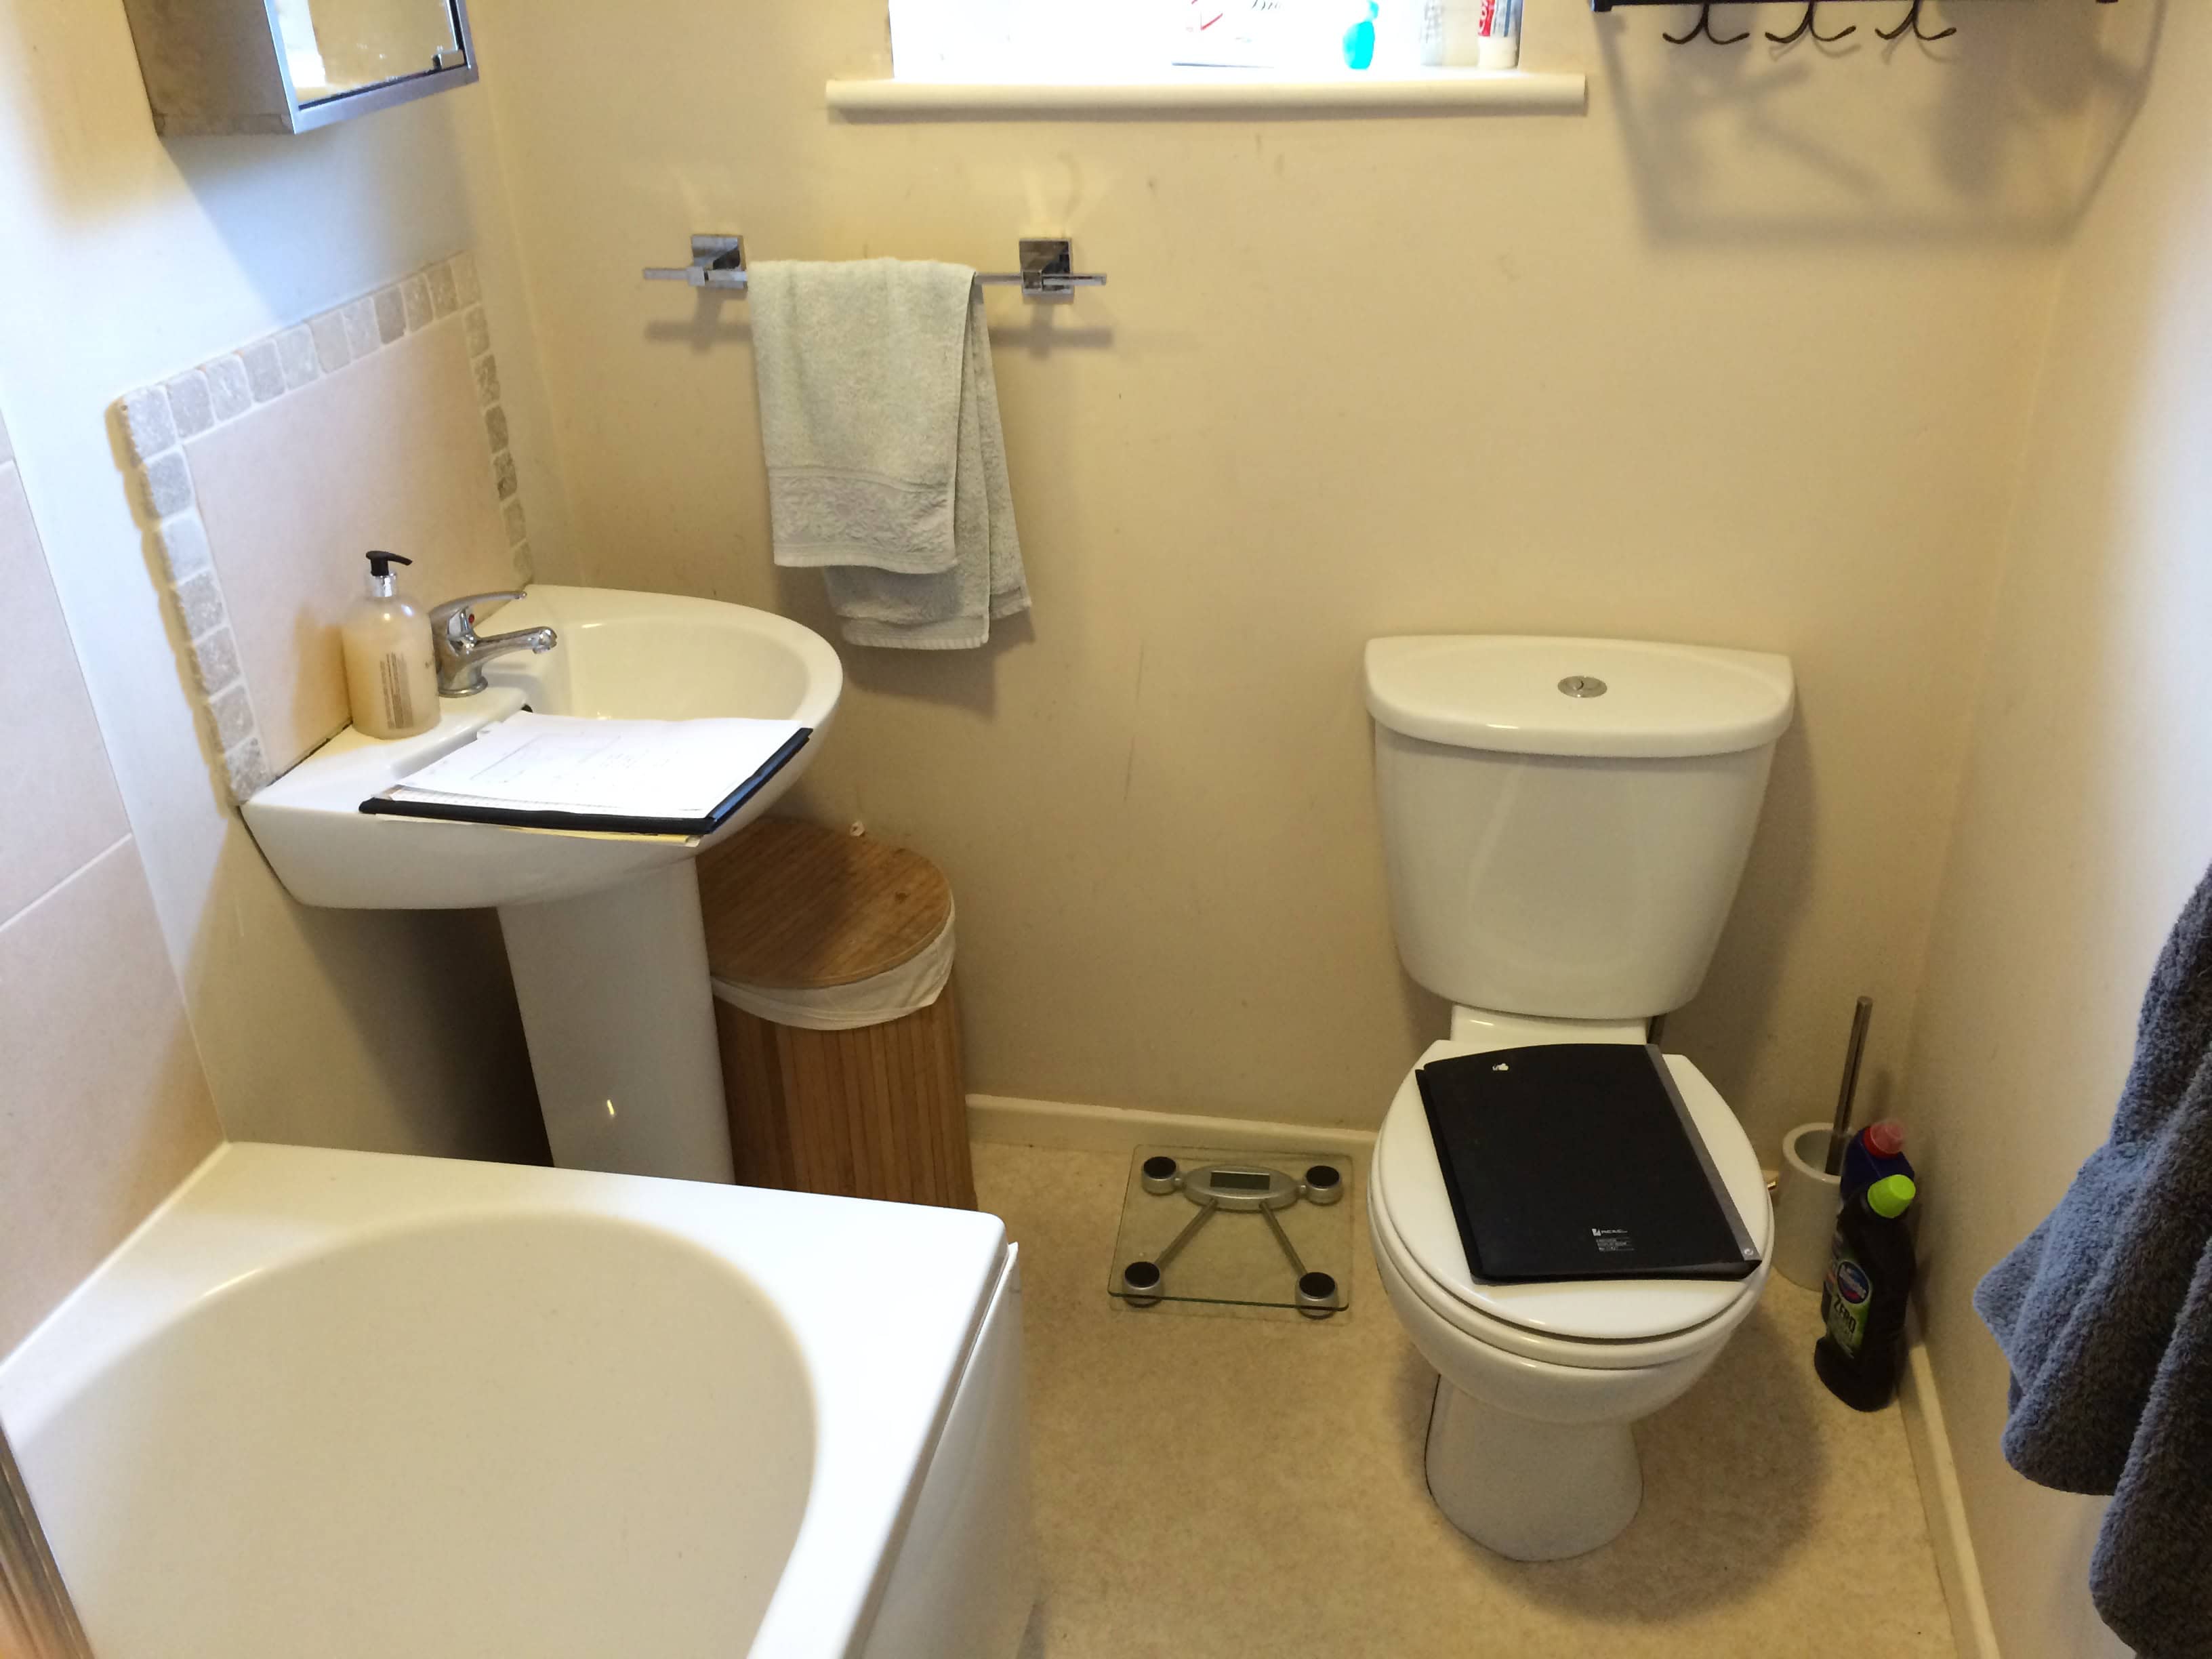
When renovating an existing bathroom or even installing a new en suite you need to plan the space.
This will ensure that everything fits and functions correctly, and is best done well before any purchases are made or installers booked.
Whether, you are installing the bathroom on a DIY basis or getting tradesmen in, you will need a plan…..
The plan

Planning a bathroom (or en suite) space effectively consists of deciding:
- What goes where e.g. suite items such as toilet, bath, shower, radiator, basin etc
- What wall & floor finishes will be required
- e.g. tiles, wetwall panels, plastered & painted walls, wooden panelling etc
- Other details e.g. electrics, underfloor heating, plastering, painting, joinery work etc etc.
Factors That Determine Your Plan
The decisions above will be made based on:
- The space you have available
- The current drainage configuration
- (as well as other local considerations e.g. the floor joist direction of travel etc)
- What ‘look’ and ‘functionality’ you want to achieve
- Budget – how much you have to spend
The outcome

As you can see, me and my team carry out bathroom installations from start to finish.
Planning what goes where
This article focuses on planning ‘what goes where‘.
In all likelihood you will need to decide where the following suite items will be positioned:
- bath
- toilet
- basin
- radiator
- shower (may be over the bath if the room is small)
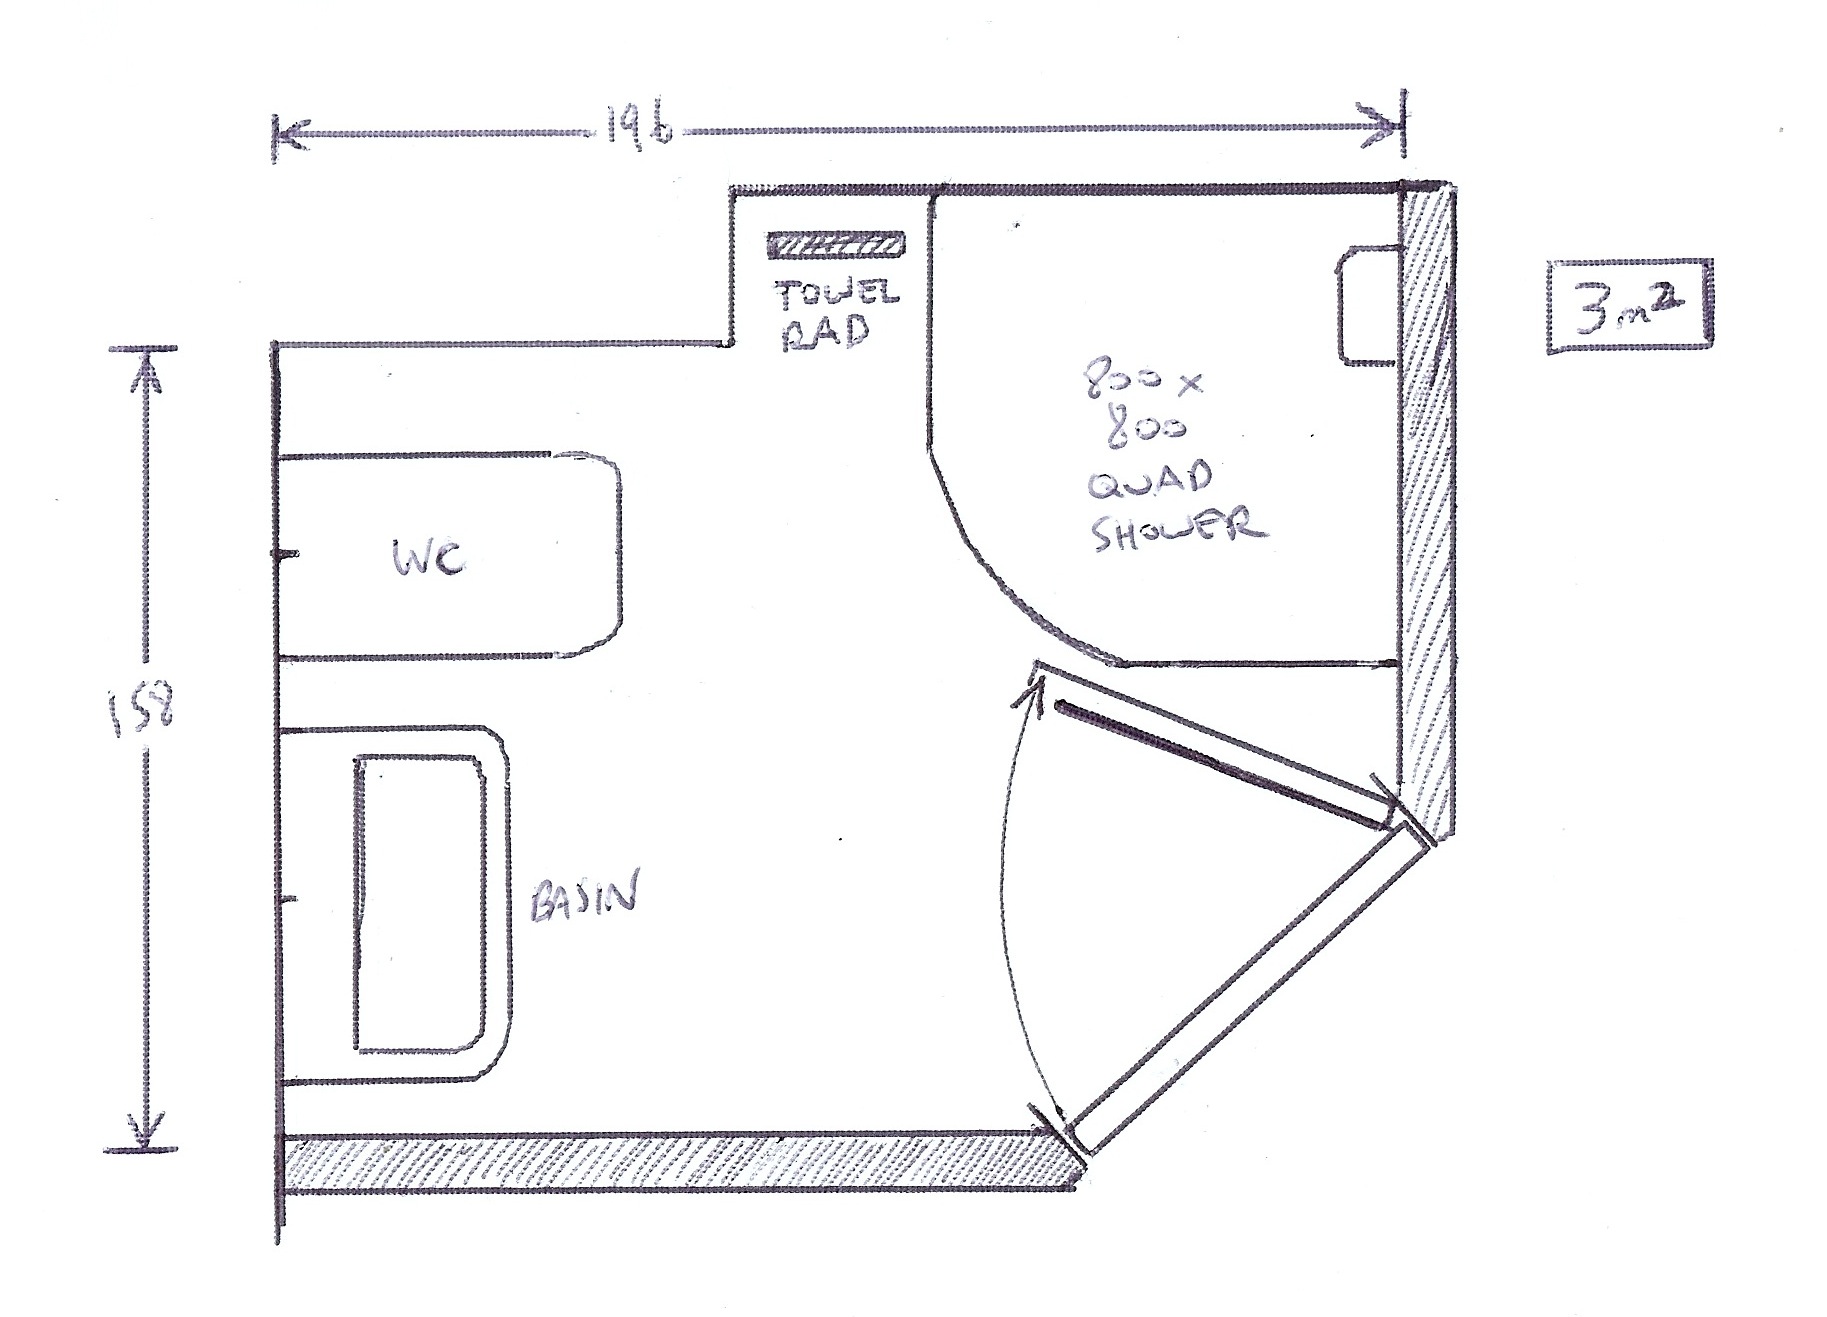
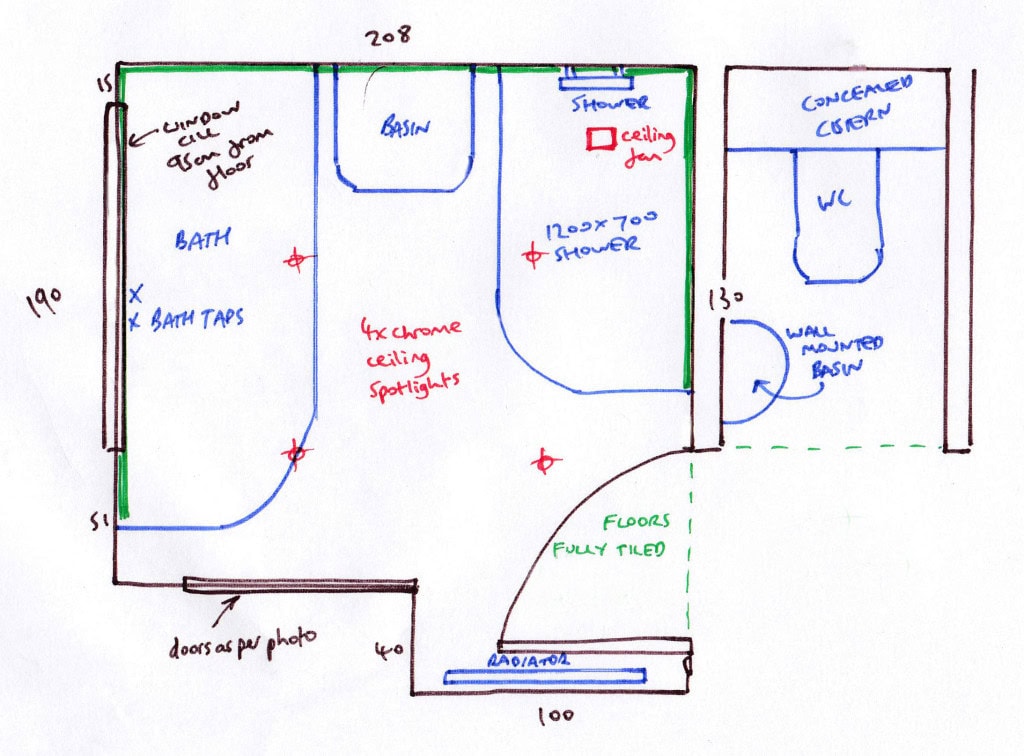
The best way of doing this is with a simple pen & piece of graph paper.
Remember, there are no prices for fancy drawings here, the sole purpose of drawing things out (to scale) is to see what will fit where, and to flag up any issues that your proposed layout may have.

Plans like this can sometimes be slightly adjusted by looking at the plan ‘in real life’ before building work commences, as it helps people to visualise the space……
Leading to a well balanced final result when spaces are at a premium……

Recommendation
Use a sheet of graph paper to easily draw scale drawings – its much quicker than CAD (computer aided design) and is easier for most people.
I’d recommend using a scale of 20:1 whereby a 1cm square on the graph paper represents a 20cm square in real life.
This is a scale that allows all bathrooms to be drawn on a single side of A4 comfortably.
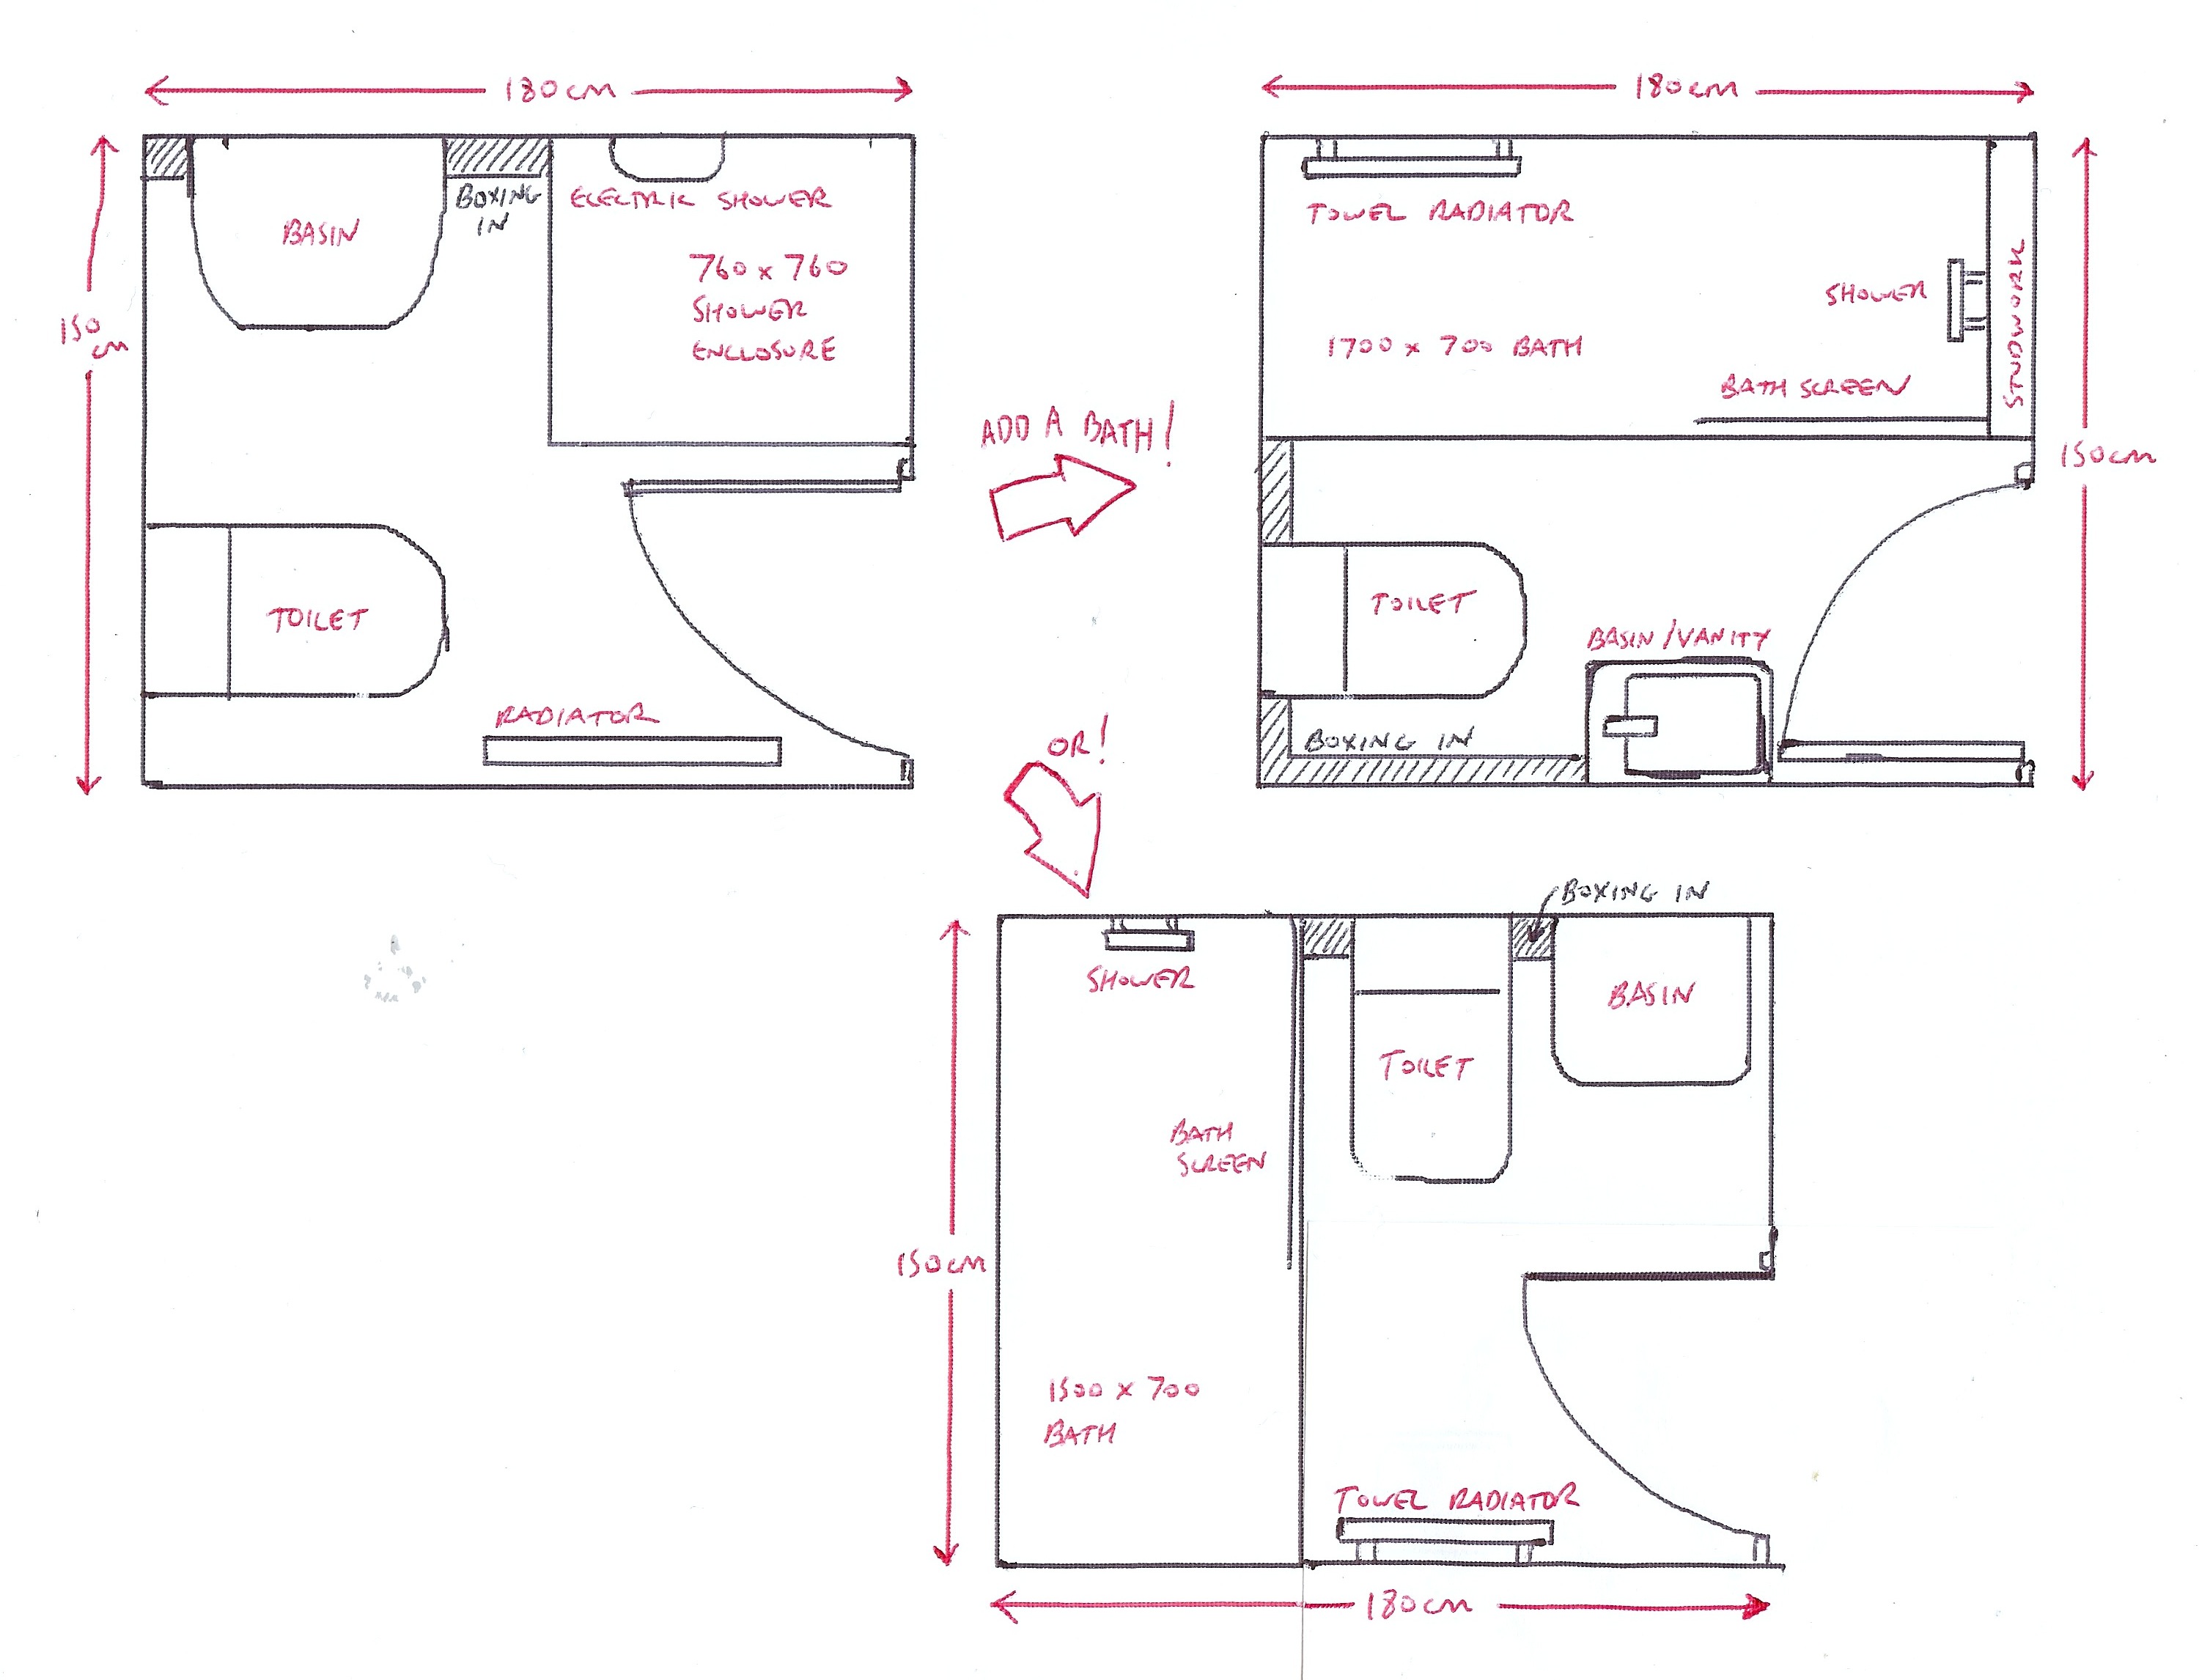
Draw up various layouts before discounting them and look at different suite item sizes to see what will fit:
Things To Note Down
- Measure your current bathroom space and draw it up to scale in plan form I.e. viewed from above.

- Note where the toilet, bath & basin drain away to – this will be important if you are doing anything other than a straight swap of suite items i.e. you will be moving things around.
- Draw in the position of the windows (with cill heights and distances from the corners of the room noted.)
- This ’empty room plan’ can now be used as the basis for your new plan.
Suite Item Sizes
Obviously if you’re drawing your room to scale, you’ll need to draw your suite items to scale.
Here is a list of standard suite item sizes…..(excluding height which is mostly irrelevant when planning):
PS For explanations of what all these suite items mean please see here.
Baths
Tiny 1200 (l) x 700mm (w) Recommended for children only
Small 1500 (l) x 700mm (w) OK for regular sized adults when space is limited
Standard 1700 (l) x 700mm (w)
Large 1800 (l) x 800mm (w)
P bath 1700 (l) x 850mm (w) Larger at one end for showering
PS Some baths have rounded corners to suit particular layouts:

Basins
Tiny 250 (d) x 500mm (w) Recommended for downstairs cloakrooms
Standard 450 (d) x 600mm (w)
Large 450 (d) x 800mm+ (w)
Extra large / double 450 (d) x 1200mm+ (w) His ‘n’ hers sinks


Toilets
Standard 700 (d) x 350mm (w)
Short projection 600 (d) x 350mm (w) More compact model for smaller spaces
Wall hung / back to wall 550* (d) x 350mm (w) * Excludes cistern
Don’t forget to plan properly to avoid things like this…..

Shower trays
Small 700 (l) x 700mm (w) A tight squeeze
Medium 1000 (l) x 1000mm (w)
Large 1700 (l) x 700 (w) Often used to replace a bath
PS Wet room formers also come in similar sizes to traditional shower trays but can be cut down to suit.


Towel radiators (traditional vertical ladder type radiators)
Small 100 (d) x 300mm (w)
Medium 150 (d) x 500mm (w)
Large 150 (d) x 600mm (w)
How To Fit These Items In
The drainage and the wall / floor space available will determine where you can have what.
Using the dimensions quoted above should deal with the space issue, so onto drainage…..
Drainage
Water needs to drain away (downhill) from toilets, basins, baths and showers so the route to the soil pipe (normally on the outside of the house) needs to be considered when positioning these items.
The toilet requires a 4” diameter drainage pipe so is often better located on an external wall.
Showers and baths require a 1½” pipe, and basins require a 1¼” pipe ordinarily. This pipework can be run over or underneith the floorboards depending on the direction of the floor joists and the required fall & run etc.
Please see here for a visual example.
Top tips
- If the gap between the corner of the room and the window reveal is over 70cm then you will be able to physically fit in a shower enclosure in the corner (though drainage also needs to be considered)
- Locate suite items on external walls whenever possible to aid drainage (assuming soil pipe is outside.)
- Radiators can generally be placed on any wall (or if there is no wall space, you can install them over the bath or even get rid of them completely and add underfloor heating.)
- Use short projection toilets when space is limited.
- Consider static & dynamic clearances when drawing things up e.g. the arc of opening doors, drawers and shower doors etc to avoid the toilet vs door example above.
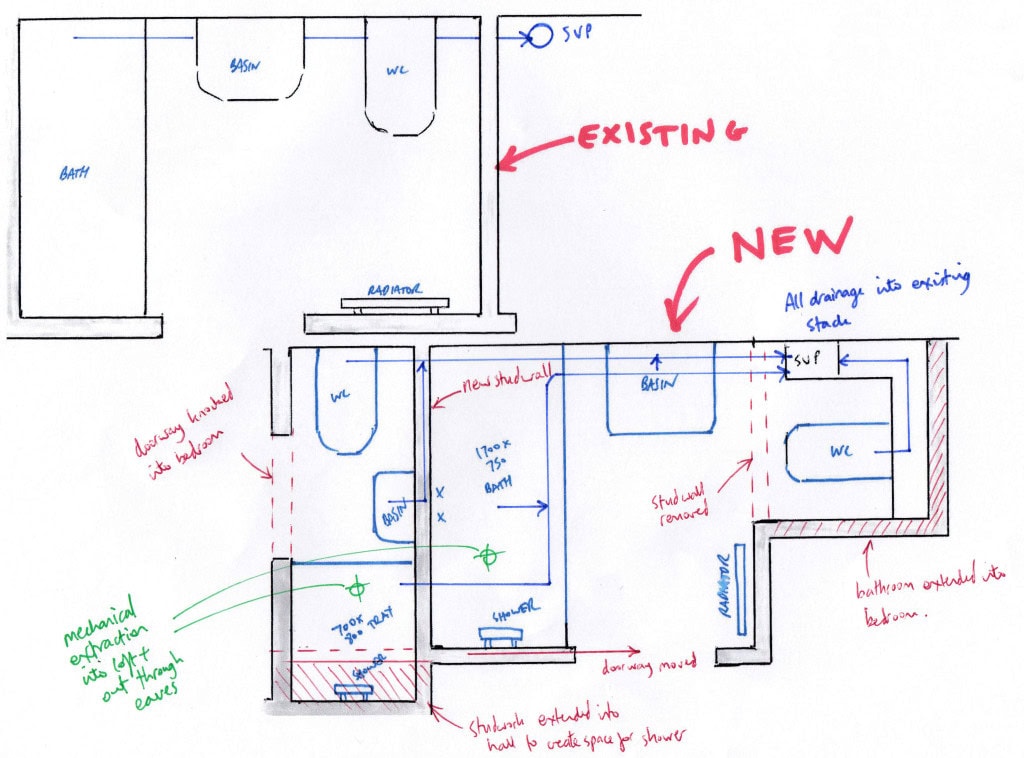
- Changing the layout of a bathroom or en suite will ALWAYS cost more to do than performing a straight swop, as it involves much more work running new pipework (both drainage & supply).
For many more tips on planning bathrooms or en suites please download my En suite installation guide.
Visualising In A Bit More Detail
Sometimes a simple plan like this:

….can be further refined by utilising CAD (computer aided design)
I offer this service to a few of my customers….
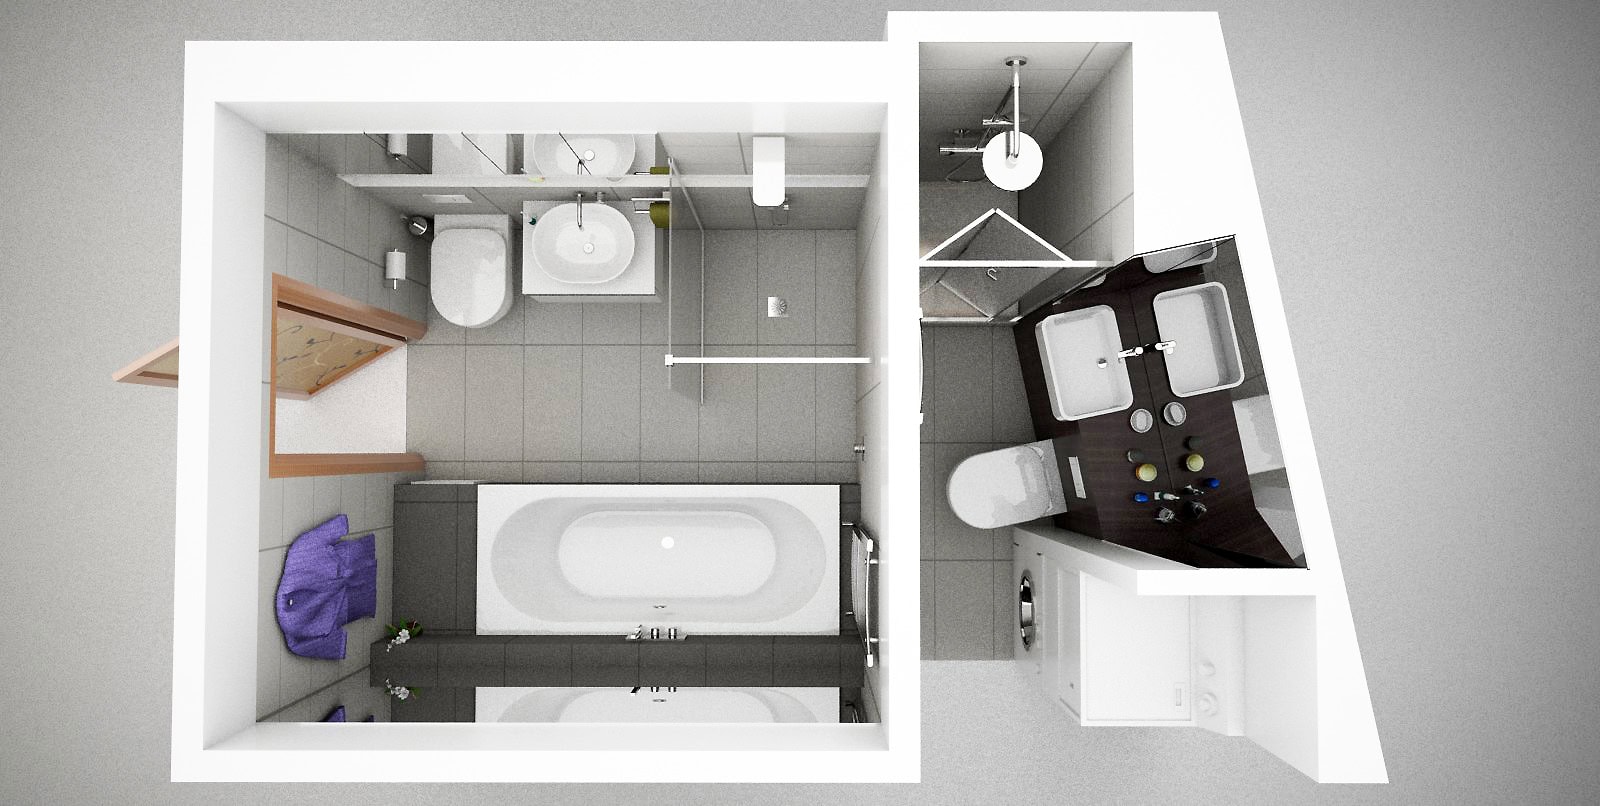
The layout is worked out in 3 dimensions and all wall / floor finishes & suite items are rendered up.
This scene can then be viewed from multiple angles and allows many design decisions to be made cheaply and quickly before any work starts, and is particularly useful on more complicated or bespoke jobs.

For my money, this is some of the best up front work you can do as it really helps to flag up and potential issues and helps to communicate design ideas to installers.

If you would like a 3D plan of your bathroom doing (regardless of where you are), please email me here with your plans (there is a cost involved in this service.)
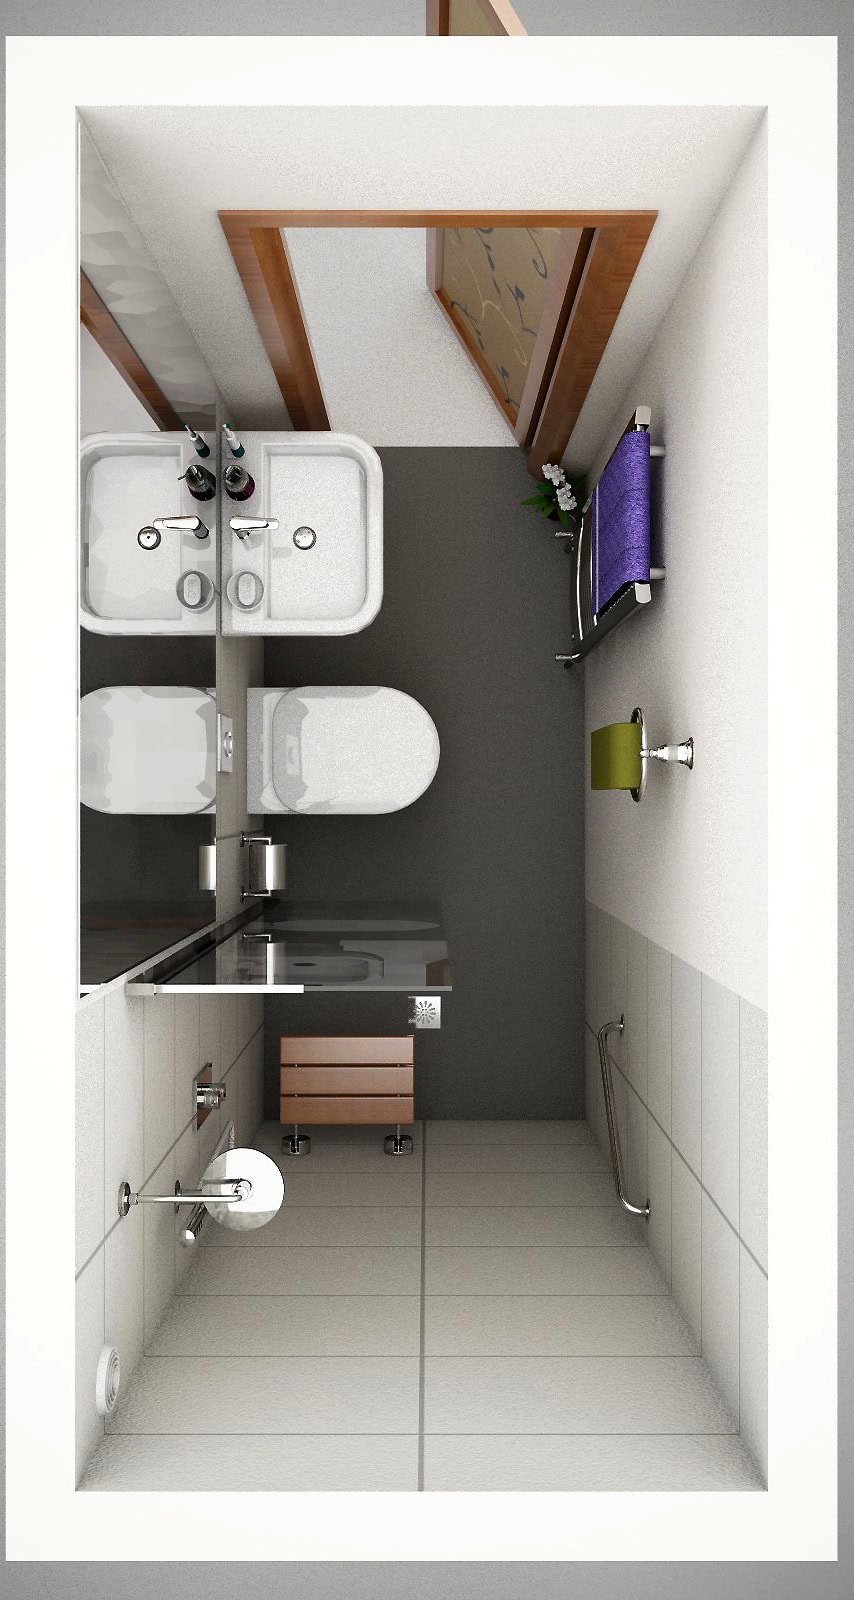
Example 2


Example 3
The best approach is to rough out ideas by sketching or drawing plans, or by combining the two…..

Before moving on to having CAD work done to refine the details…

Could This Help You Visualise Your New Bathroom?
Turn this:
Into this:

What We Do
We plan bathroom installations….
And then install them from start to finish with our team of skilled tradesmen….

…..so the customer doesn’t have to worry about planning the job, sourcing lots of independent tradesmen, finding suppliers & managing the job as it progresses.

Instead they can look forward to their finished bathroom:

Please contact us for a quote.