This Article Explains The Simple Steps Involved In Fitting A Thermostatic Bar Mixer Shower As Part Of Your Complete Bathroom Installation.
PS. Please see here for the reasons you should consider employing us to do this for you!
Process
Step 1 – Remove the existing shower valve & tiles

- The water is isolated, the pipes are drained and the existing shower valve is removed.
- The wall tiles are then removed.
Step 2 – 1st fix pipework
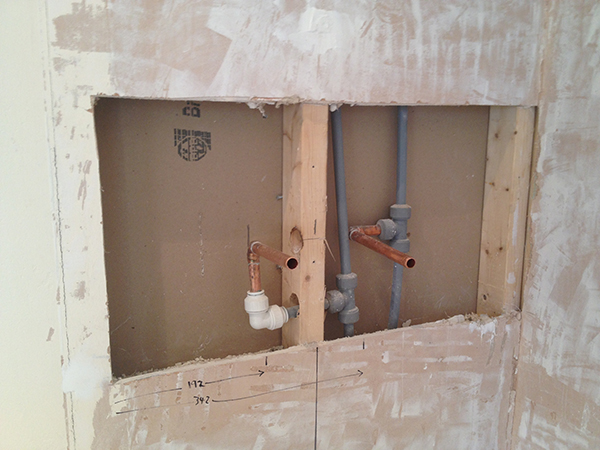
- The plasterboard wall around the pipes is cut back to the nearest vertical studs to expose the existing pipework within the wall.
- The existing pipework (hot & cold feeds to the shower valve) are adjusted so that they protrude out of the wall at 150mm centres, centred on the line where the bath taps will be below (for aesthetic purposes.) The hot feed is on the left, cold on the right – it has to be this way round to suit the shower valve and this is standard.
- Copper pipework is used in conjunction with plastic (push-fit) pipework. As the shower valve fixing kit uses a compression fitting to make a watertight seal, the pipes that protrude out of the wall should be run in copper. This is because I have found that compression fittings are best done directly onto copper rather than onto pushfit pipe (even with a reinforcing insert).
Step 3 – Reboard the wall

- Wooden batons are screwed to the edges of the plasterboard that has been cut away so that once the new piece is inserted, it can be screwed to these (as well as the vertical studs) to give extra strength and limit potential flexing which could cause problems.

- A piece of 12mm plywood is used to reboard the area, and 2 x 16mm diameter holes are drilled with a spade bit to allow the water pipes to poke through (by a few inches – these will be cut down later to suit.)
- This plywood is screwed to the vertical studs and to the supporting batons added previously, taking care to avoid the concealed pipes beneath.
- Temporary stop ends are added to the pipes so that the water can be turned back on at this stage.
- All plywood edges are sealed to the surrounding plasterboard with sanitary silicon (white silicon has been used above to allow it to show up, but any colour is fine as it will be unseen once tiled.)
I have used plywood rather than plasterboard in this instance to allow me to screw the shower valve fitting kit directly into the wood later on, ensuring a strong fixing (as opposed to using a rawlplug or equivalent in plasterboard.)
The depth of the plasterboard is 12mm which is the same as the existing plasterboard with the skim layer of plaster on top of it – This ensures that the face of the new board will be flush with the rest of the existing wall.
The 2 holes in the plywood that allow the hot & cold feeds to protrude out are drilled tightly around the pipes to ensure that the pipes are held:
- level
- at 150mm centres
- centred on the bath below (for aesthetic purposes)
It is important not to drill large holes as this will affect the fitting of the bar mixer fitting kit later.
Step 4 – Tank the shower area

The entire ‘wet area’ around the shower is then made waterproof by using an all in one tanking kit.
This is to protect the installation from any potential water ingress behind the tiles.
Step 5 – Tile the walls

The walls surrounding the bath are then tiled with ceramic tiles, and grouted once the adhesive is dry.
When fitting the tiles around the pipes, you must ensure that the pipes are kept level, perpendicular to the wall, 150mm apart and centred where you intend them to be.
The holes that you drill must also be as small as possible to avoid potential problems when fitting the bar mixer fitting kit later.
This means that you will have to isolate the water supply and remove any temporary stop ends to allow for the smallest holes to be drilled.
The tiles are then sealed to the bath with silicon and the vertical wall joints are also sealed with silicon to prevent any future grout cracking in the corners.
Step 6 – 2nd fix pipework

The shower valve can now be attached by the use of a shower valve fixing kit.
If your pipes are completely accurate then I would recommend this.
If they are a few mm out of level / 150mm centres, or you have a bit more cash to spend, then I would recommend this.