This article follows on from the article How to fit bar mixer shower pipework (which explains how to carry out 1st fix pipework) and explains how to use a Mira bar valve fixing kit to attach any standard bar mixer shower onto the pipework in the wall.
Introduction

You should have 2 x 15mm copper pipes protruding from the wall at the intended location of the thermostatic bar mixer valve (hot on the left, cold on the right) at 150mm centres. These pipes should also be level and square to the wall, which should now be fully tiled & grouted. For details of how to do this please see how to fix bar mixer shower pipework.
Mira bar valve fixing kit – part 1663.017

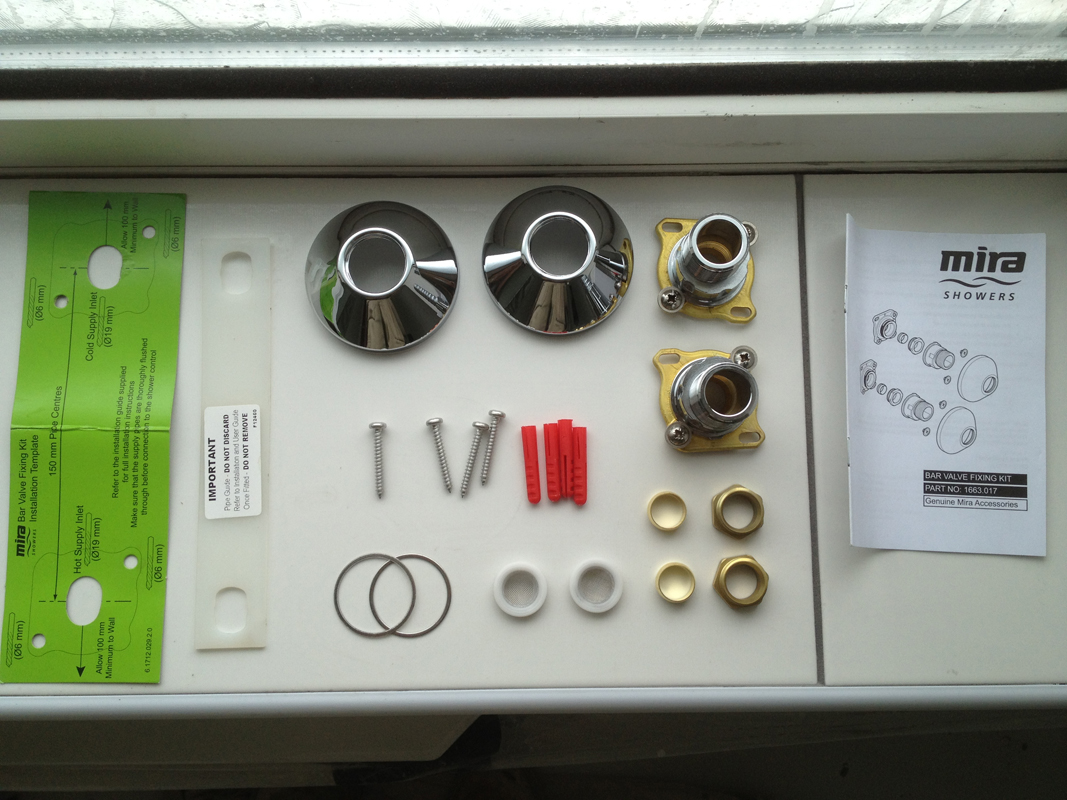
This article shows how to use a Mira bar valve fixing kit (shown) to attach any standard bar mixer to rigid pipework that has been set at 150mm centres.
For:
- Water connections are made in front of the finished wall surface (unlike traditional ‘Z’ connectors)
- Easy centre and levelling adjustment (unlike this one)
- Foam seal to prevent water ingress
- Bar valve is secured to the wall which makes the installation more secure than some other methods.
- Suitable for any bar valve using 3/4” female threads
Against:
It is more expensive than other fixing kits at around £40.
When to use this fixing kit over others
If your 1st fix pipework is not quite correct e.g. 152mm centres with one pipe 2mm higher than the other one,then this fixing kit allows for up to 5mm adjustment as shown.


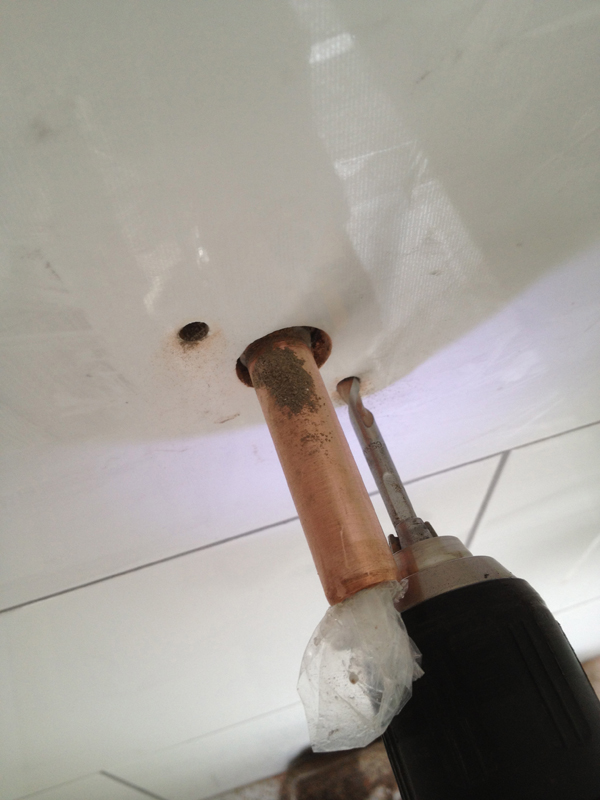
Ensure that the water is turned off and the pipes are drained.
1. Remove the temporary stop ends and clean both pipes using wire wool or plumbers mesh strips.

Fit the installation template over the inlet pipes and mark the positions of the 4 wall bracket fixing holes as shown. Ensure none of the holes correspond to a pipe hidden in the wall to avoid drilling through it.

The holes are then drilled using a 6mm tile drill bit as shown. This type of drill bit is excellent for drilling ceramic tiles as its sharp arrow head design ensures it does not skid off the tile surface even without applying masking tape to the surface 1st.
PS If you have porcelain tiles (or another type of hard tile) you may need a more specialist drill bit.


Red uno rawl plugs are then inserted into the holes as shown.
I never use the fixings that come with these types of kit – they are always inferior and the screws always end up turning the wall plugs – this also applies to fixing curtain poles and just about anything else to be honest.
Tips of the trade
Be careful when hammering the wall plugs in and use a suitable sized hammer – you don’t want to swing and miss and smash a tile.If the holes are near the edge of the tile or the tiles are very thin, you might be better hammering the wall plugs into the brick wall behind if possible. This ensures that when the screw is tightened into the wall plug the expansion pressure doesn’t crack the tile as it is exerted into the brick surrounding the drilled hole rather than the tile itself.This is done by inserting the plug so that it is as shown above and then inserting a screw 5mm into the fixings before gently hammering it through to the wall behind, ensuring that it is not too deep in the wall for the screws you will be inserting.

Assuming you haven’t hammered the plugs through to the brick wall behind, the ends are trimmed off using a stanley knife holder to ensure that the wall plates can sit flush against the tiled wall.

The next task is to ensure that the pipes protrude out from the wall the correct amount according to the manufacturers instructions – In this case a distance of 25mm is marked – a steel ruler is used here as it is easier than a tape measure.

The pipes are then cut using a pipe slice to ensure a square cut and the ends are then de-burred.


Remove the offset connectors by unscrewing the 2 retaining screws, and fit the wall brackets onto the pipes.


Slide the olives onto the inlet pipes and loosely fit the nuts.


Secure the wall brackets (with the arrow at the top) to the wall with the screws supplied (the foam seal on the back side will form a watertight seal with the wall.)

Ensure you select the correct screwdriver head to do this to reduce the likelihood of stripping the screw head.
Do not use a drill to do this! You will fire the screws in with far too much power and crack the tile.


Next, tighten the nut against the wall brackets. This will crush the olive against the copper pipe and form a watertight seal.
To do this, use an adjustable spanner to grip the nut and turn it clockwise.
Be sure to hold the wall bracket firmly with a set of water-pump pliers (or similar tool) to ensure that you are not putting undue stress on the wall bracket fixing screws (which could lead to cracking of the tiles) as you tighten the nut up.
Tips of the trade
As with all compression fittings, knowing how much to tighten up the fitting to ensure a watertight seal is something that comes with experience, but if you find the spanner slipping off the fixing bridge, chances are it’s tight enough!


Next, slide the offset connectors over the wall brackets and place the locking washers over the offset connectors, securing loosely in place with the retaining screws.

Attach the bar mixer shower to the fixing bridge as shown, ensuring that all necessary rubber washers and filters are in place (as shown on the hot feed on the left in the photo). These should come with the shower valve.
PS Sometimes the filters that come with the shower valve are not flat and subsequently do not fit correctly, so separate filters have to be bought. This varies from shower valve to shower valve.


If necessary, rotate the connectors anti-clockwise to adjust the centres so that they are in line with the bar valve inlets and are level.

Once the valve is attached and level, firmly tighten the retaining screws to lock the offset connectors in position.

Remove the shower valve and attach the concealing plates onto the offset connector threads and rotating them until they sit flush to the wall.
Top tip
Now is the time that you may wish to add some 3/4 brass cap with a rubber washer inside to act as a stop end and turn the water on. If either of the compression joints are leaking, they may need to be ‘nipped up’ a little more before progressing.Now is also the time to flush out the pipes if you did not do this at 1st fix stage (when you first put the pipes in)After testing & flushing, turn the water back off to complete the installation of the bar mixer shower valve.


Make sure that the sealing washer/filter is fitted in the correct orientation, offer the bar valve up to the offset connectors and tighten the nuts.
Take care not to damage the chrome plated surfaces.
Turn the water on and test for leaks.

Attach The Riser Rail To The Wall With The Same Drill Bit And Wall Plugs
Attach the riser rail to the wall with the same drill bit & wall plugs and you have now finished.
Tips of the trade
PS Be sure to attach the shower hose & head to the valve when setting the height of the riser rail to ensure everything fits together properly.