This article follows on from Tiling on wooden floors (Part 3 – securing the floor covering ) & explains the process of tiling over wooden floors, focusing on overboarding the existing (or newly fitted) floor.
Over-boarding introduction
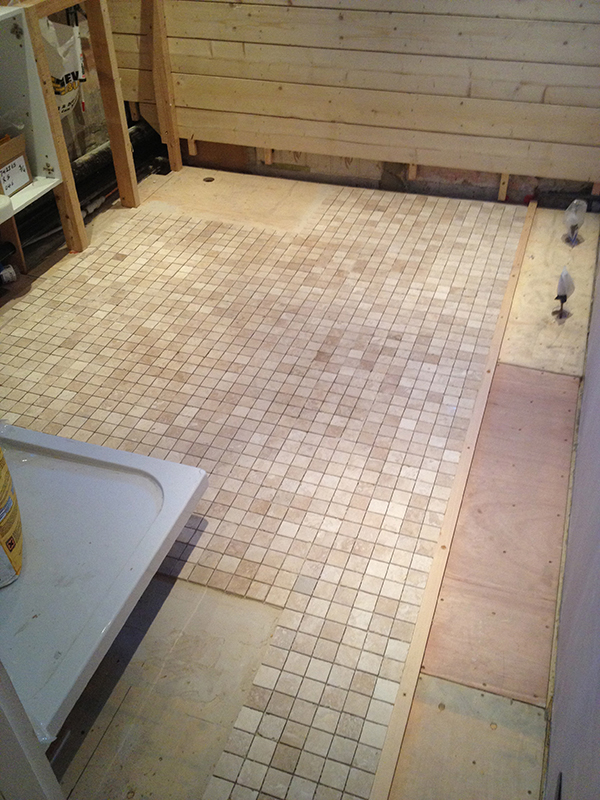
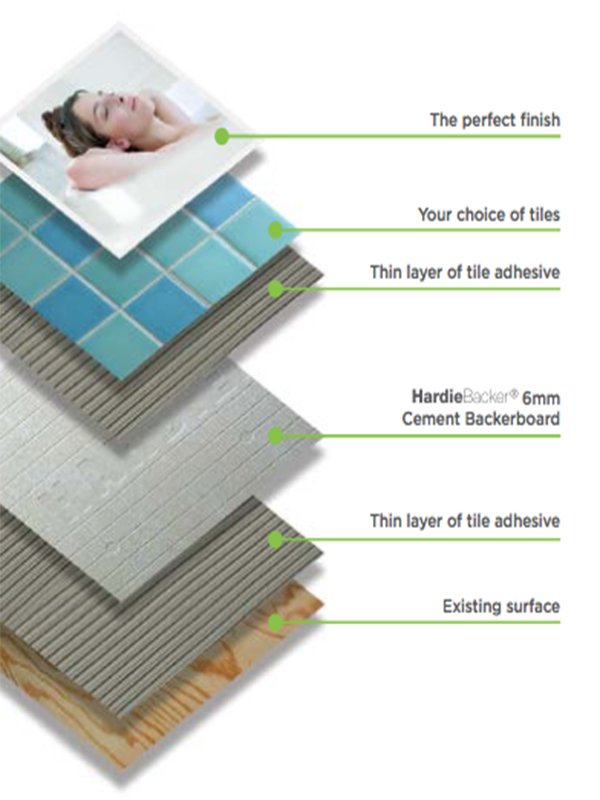
Over-boarding the floor involves laying a relatively thin board on top of your existing floor (floorboards, chipboard or plywood) to stabilise the area ‘as a whole’ and provides a strong and smooth surface to apply tiles onto.
This approach is used after the subfloor (floorboards, chipboard or newly laid plywood) is solidly secured to the joists with no deflection.
Over-boarding does not add much structural strength to the floor (i.e. it will not remedy floor deflection.) Therefore, you may still have to follow steps outlined in the previous articles in this series prior to installation.
Do I need to overboard?
In short, yes.
If you have floorboards or chipboard you will need to carry out one of the over-boarding options listed below.
PS
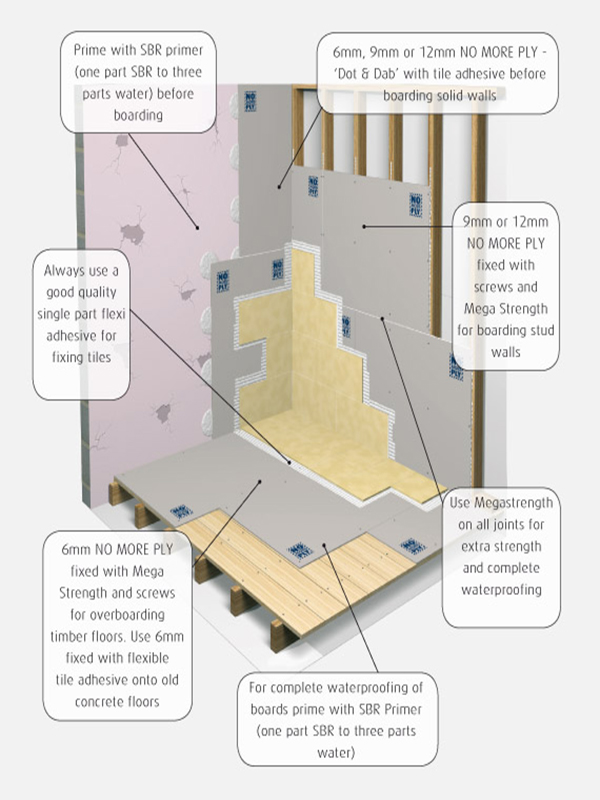
If you have replaced the existing floor with 22mm+ plywood, you may still wish to overboard it with a tile backer board for its waterproof / stability / thermal qualities.Also, tiles adhere better to backer-boards such as no more ply, which is what I use.
Over-boarding options
Option 1 – Overboard with plywood
British Standards recommend a minimum of 15mm thick plywood to be used for over-boarding purposes (any less will not provide the rigidity required). This involves screwing a sheet of plywood over the top of the existing floorboards / chipboard or plywood to provide extra rigidity and a flat surface onto which to tile.
PS
If tiling with stone tiles or on a floor with slightly more movement, you may wish to overboard with an even thicker plywood (18mm) and use decoupling matting on top.
Tips of the trades for overboarding with plywood:
Please see the article Screwing down structural plywood to joists and add:
- Screw down every 150mm in every direction with 4 x 40mm Turbogold woodscrews directly into the joists where possible rather than just into the T&G floorboards / chipboard below, taking care to avoid concealed pipes and cables. You will need a lot of screws!
- Ensure plywood sheets do not join directly over a floor joint below. They should be offset or staggered to limit potential flexing relative to each other.
- Should be external WBP or marine ply.
Potential problems:
- If water makes it’s way through to the plywood it can swell, causing your tiles to lift or grout to crack.
- Changes in humidity in bathrooms could cause the plywood to swell and contact (even if there is no ‘water’ in direct contact with it, leading to similar problems.
- Fungal growth caused by rotting plywood can react with tile adhesives, causing your tiles to lift.
- There are also reports of the preservatives present in marine ply (to keep it waterproof) leeching out into the grout, giving it an orange stain, though I can’t say that I’ve seen this personally.
- 12mm ply (when combined with the thickness of the floor tile and adhesive) can result in a sizeable step into the bathroom, which can represent a trip hazard.
- You need hundreds of screws to make sure its secured correctly (every 150mm).
- Plywood is a natural product and can vary in quality.
Some of these problems can be overcome by opting to overboard with a purpose designed tile backer board….
Option 2 – Overboard with a tile backer board – e.g. No More Ply
The theory to over-boarding with tile backer boards is to provide a rigid, stable, waterproof base for tiling onto. This can normally be achieved with a thinner board than the plywood equivalent, meaning there is less of a step into the bathroom.
Boards are essentially glued and screwed over the top of the existing floorboards, plywood or chipboard subfloor.
Depending on the manufacturer, the ‘glue’ part of the equation may be in the form of a tubed construction adhesive or a thin-set tile adhesive which is better suited to level out uneven floor coverings.
Very uneven floors may need self-levelling compound to be applied in addition.
There are many tile backer board options available but I choose to use no-more ply because it is:
- Thin – As the board is only 6mm thick, you can prevent a large step up into the bathroom and the threshold problems associated with using 15mm ply.
- Sold in my local tile merchant of choice at a good price.
- Relatively cheap per board (120 x 60cm = <£10).
- Waterproof – can be submerged in water and not lose its structural integrity – although it needs to be primed with SBR primer 1st (after laying).
- Heat resistant – this is good for bathroom underfloor heating as it helps to reduce heat up times, ensuring your floor gets up to temperature quicker as heat is not lost ‘down’ into the floor, but reflected back ‘up’ into the tiles. Again, the SBR primer helps with this.
- Easy to handle – Its small size (120 x 60cm) allows you to fit it in your car and not dint your hall walls when you carry it upstairs.
- Soundproof, in that it reduces noise transmission to the rooms below
- Gets a great bond with rapid-set adhesive so tiles are firmly stuck, especially if primed with SBR primer 1st.
- Quicker to lay than plywood as less screws are needed (8 per board) than when overboarding with plywood. This is because cement based tile backer boards are more structurally sound and do not expand / contract with changes in humidity and therfore do not need lots of screws to hold them still.
- The glue that no more ply is glued down with absorbs any slight movement in the subfloor beneath, and also waterproof any joints, making no more ply suitable for wet rooms.
- It integrates with the kaskade wet room system which I think is the simplest wet room system.
- They are simpler to cut that plywood (in that no power tools needed) as they can be cut with a special knife. Top tip – Cut shapes with a grit edged jigsaw blade and drill holes for pipes with a diamond coated drill bit.
PS
For detailed fitting instructions, please see www.nomoreply.net/howto.htm.
Option 3 – Overboard with another type of tile backer board – eg Marmox, Wedi, Hardiebacker etc.
Other options along the same lines are HardieBacker® 250 Cement Boards, and with these boards, the manufacturer recommends reinforcing the joints with tile adhesive and scrim tape (rather than a tubed adhesive as with no more ply) to join all of the floor together as a whole for added strength.
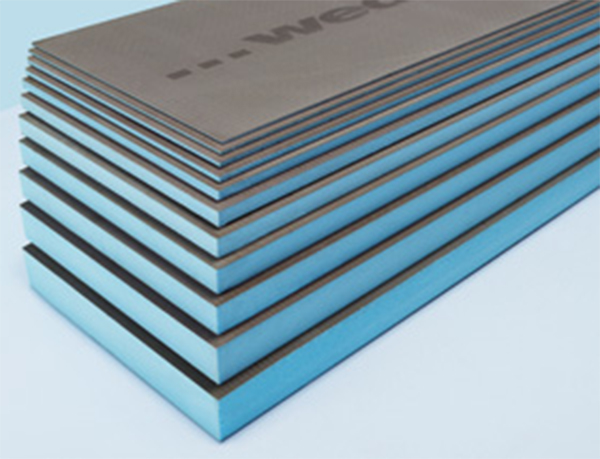
Marmox or Wedi boards are a more expensive option, and they have better thermal qualities (in that they are more insulating) although I would question their structural strength vs no more ply as they easily bend & dent.
They are however, very light and easy to cut with only a stanley knife, and can be bought in various thicknesses and used to insulate walls in cold bathrooms – please see here for a case study.
Also, most of these other boards are designed to be secured to the floor with a polymer modified (flexible) cement based tile adhesive, which does not absorb as much movement in the subfloor as the no more ply tubed adhesive (in my opinion.)
Whichever tile backer board you use, follow the manufacturers fitting instructions. Ask the retailer you buy the boards from for this, or look on the manufacturers website.
Safety tip
Cement based tile backer boards contain respirable crystalline silica, which is carcinogenic.Therefore, use the score and snap method of cutting boards wherever possible, and use a specialist circular saw blade (Hardieblade) combined with dust extraction if necessary.Limit dust inhalation by cutting outside and always wearing a good quality dust mask.