This article shows the process of fitting a wall hung basin on a stud wall. All work carried out by ukbathroomguru.com.
What we do
We install quality bathrooms from start to finish, with all the bits in between taken care of.
We provide advice and guidance during a free site survey, and we have a blog with lots of articles that cover frequently asked questions and show you examples of our recent work.
We install bathrooms from start to finish, supplying all the necessary trades and project managing the whole process, so you don’t have to!
We work to detailed, itemised estimates with fixed costs, so you can budget properly without fear of unexpected skyrocketing prices.
Our focus is on doing a proper job for a fair price in a reasonable time – see here for more info.
Fitting a wall hung basin on a stud wall
Process:
- Remove basin & semi pedestal from box & set aside all fixings.
- Fit tap to basin
- Fit waste to basin & attach trap
- Mark the intended position of basin on wall – set the maximum height of the basin to 90cm (default) or to suit.
- Measuring off the top of the basin, note the position of the 2 x supporting bolt holes on the back and transfer these marks onto the wall, centring the basin in its intended location.
- Remove the plasterboard from the studs, and insert noggins so that the supporting bolts can be screwed directly into them at the 2 locations previously marked.
Tip: turn 3×2’s sideways to give yourself a larger margin of error

- Above you can see that one bolt is in the vertical stud, and the other is in the new horizontal noggin.
- Once the noggin has been added and the bolts inserted, reboard the wall temporarily and hang the basin on the wall.
PS If the wall is to be tiled, pack the wall out by the intended depth of the tiles + adhesive by using a packer – this will ensure accurate pipework.
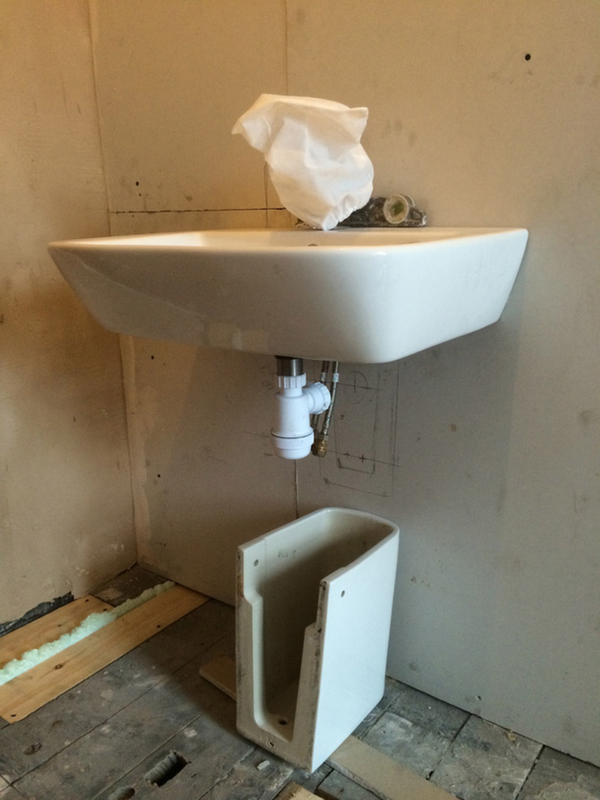
- Using the basin as a guide, hold up the semi pedestal and make sure the trap fits inside without fouling on it
- Measure how far out the basin waste pipe needs to emerge in order to fit into the trap correctly and note down this measurement – 152mm in this case as marked on the wall in the picture below.
- Mark the position of the semi pedestal fixings on the wall – you can then add a 2nd noggin so that the semi pedestal is fixed directly to it (You can see these on the 1st picture above highlighted by 2 x black arrows)
- Holding the semi pedestal in place, draw around its outline.
- Noting the thickness of the semi pedestal, draw the inner edge of the semi pedestal – this will give you the area in which all your pipework (hot & cold plus waste) must be contained – If it is not, it will clash with the semi pedestal.
- Mark the position of where you want the waste pipe to come out directly into the back of the trap (whilst maintaining a slight fall of course)
- Mark the position of where you want the hot & cold pipework to come into the semi pedestal (2 x small crosses at the bottom of the semi pedestal in the photo above) – take note of how you will fix this pipework onto the tap tails at 2nd fix (without kinking) and make provisions to add isolating valves if possible. The ideal scenario would be to fit the pipework with isolating valves at 1st fix so that the tap tails can simply be screwed on at 2nd fix with no further pipework / draining down required.
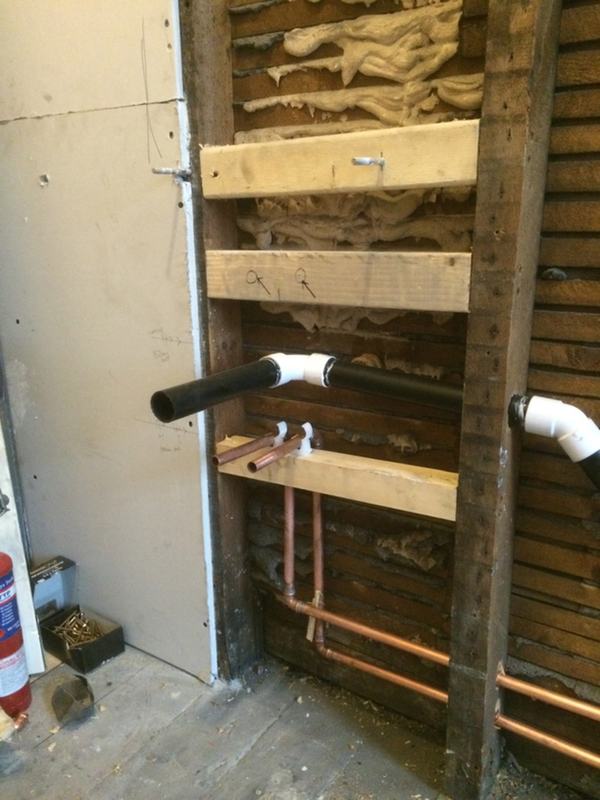
- Drill holes in the plasterboard to the pipework (2 x 15mm pipes and 1 x 32mm pipe) to protrude:

- By this stage you will know how far out from the wall you need your pipework to protrude (waste 152mm in this example, hot & cold 50mm before installing an elbow that is fitting into a compression iso) as well as its position.
- Transfer the position of these holes where you want pipes emerging from the wall across onto the adjacent board (as when you take the plasterboard off the wall to run all the pipework you will no longer know where they all need to protrude.)
In this instance I marked the horizontal levels (of the water supplies and the waste) with a spirit level, and also noted measurements off the side of the adjacent plasterboard.
You can see that the waste needs to emerge 140mm off the edge of the adjacent plasterboard in line with the top horizontal line. The hot and cold feeds need to emerge from the wall on the lower horizontal line 120mm & 160mm from the edge of the plasterboard respectively – hot on the left, cold on the right – ALWAYS)
- Run the waste to its intended location 1st as it is the largest bore pipe and the one with the most restrictions with its placement I.e. it has to run downhill, whereas the hot & cold can run around it is required. The waste pipe is made purposefully too long, as it can be cut down once the plasterboard in stalled for an accurate measurement (how much it protrudes from the surface of the plasterboard).
- Run the hot & cold pipes to their intended locations – you can see in this example that an additional noggin has been added to secure the pipework to (fixing it accurately in place with no chance of movement during reboarding etc)
- Reboard the wall and skim & decorate / tile as intended LEAVING THE SUPPORTING BOLTS IN SITU THROUGHOUT. These will ensure that the basin is fitted into EXCATLY the same location at 2nd fix and all your pipework will line up correctly.
- Fit the trap onto the waste pipe.
- Fit the basin onto the bolts and tighten in the correct location – use a spirit level to ensure the top edge of the basin is kept level.
- Tighten up the trap onto the basin waste.
- Isolate the water supply & connect the tap tails to the hot & cold supplies.
- Turn the water on and test all connections for leaks – hot, cold & waste thoroughly.
- Once satisfied that there are no leaks, fix the semi pedestal fixings to the wall, secure in the knowledge that you’ll be fixing into the timber you fitted earlier.
- Offer up the semi pedestal and fix it in place.
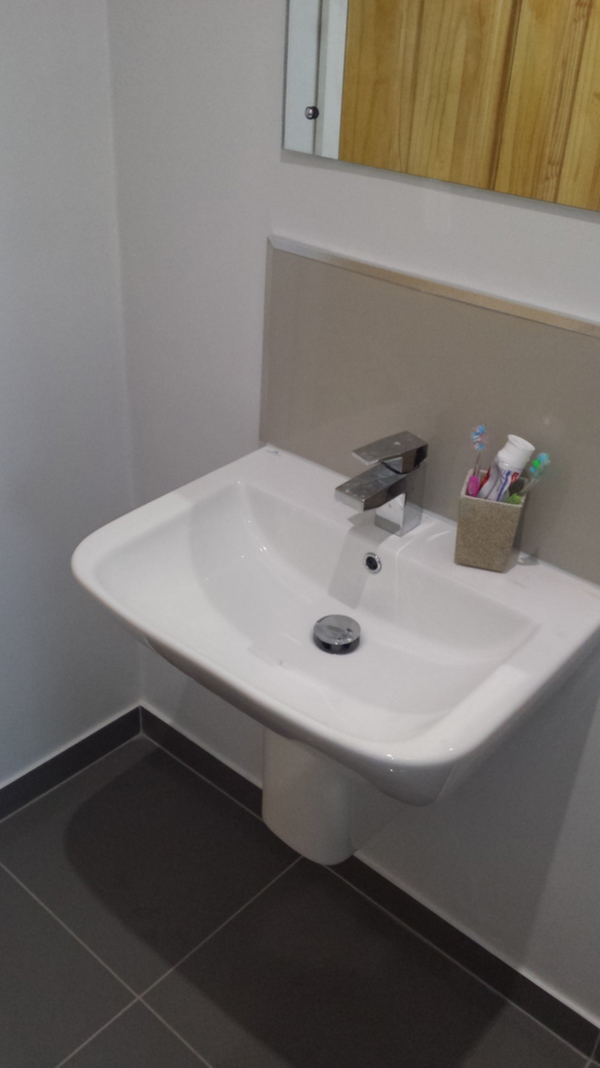
A tiled splashback can now be added.
Summary
Thanks for reading, leave a comment or contact me if you have any questions
Chris