This article will explain the order in which a typical bathroom installation may run on ukbathroomguru.com bathroom installation.
Introduction
Understanding the correct order to stagger the various trades/tasks involved in a typical bathroom installation will ensure that jobs get finished more quickly, cheaper and to a higher finished standard.
The rest of this article will talk you through the steps involved in a typical bathroom refit (done by myself and my team in Horsforth, Leeds in this instance.)
Disposal
The bathroom is emptied of all personal possessions prior to the bathroom installation team arriving.
Upon arrival carpet protectors are put down to limit potential damage – please see 7 ways to reduce damages, disputes & delays for more tips on this subject.
The water is turned off & the central heating system is drained
Miscellaneous items are removed e.g. blinds, cabinets, toilet roll holders, etc.
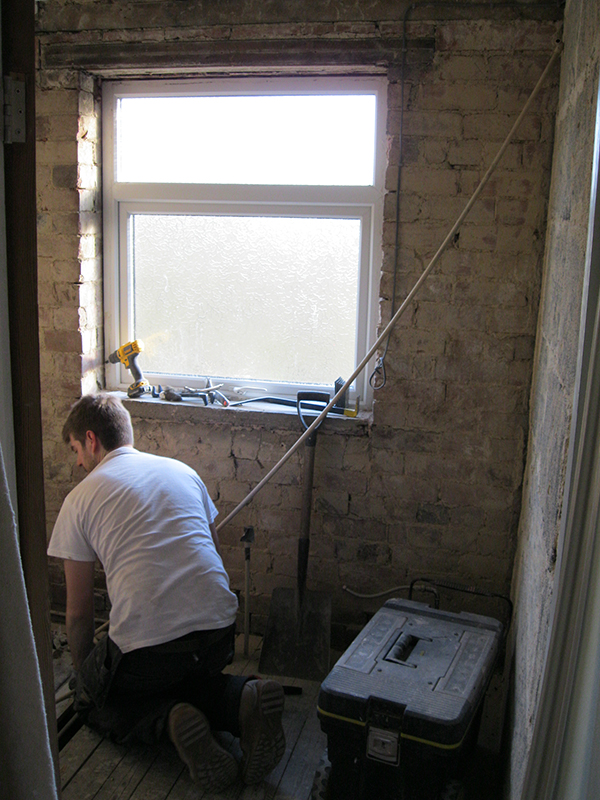
The existing suite is removed i.e. the bath, shower tray & enclosure, bath & bath screen, shower, basin, toilet, etc and put in a skip.
Top tip
The bath is the last suite item removed to allow any wastewater from the toilet pan or basin trap to be drained into it.
All waste pipes are removed as new ones will be fitted as part of the new installation – this ensures the new pipework will be clean and free of debris such as hair and soap which often clog up old waste pipes, particularly if they run uphill!
All electrical connections are disconnected where appropriate and capped off e.g. the old electric shower in this instance.
Tile removal
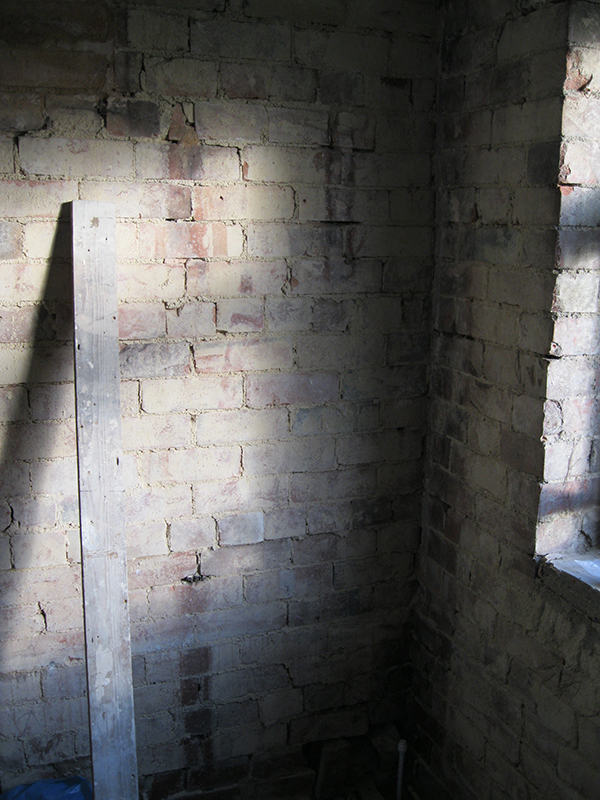
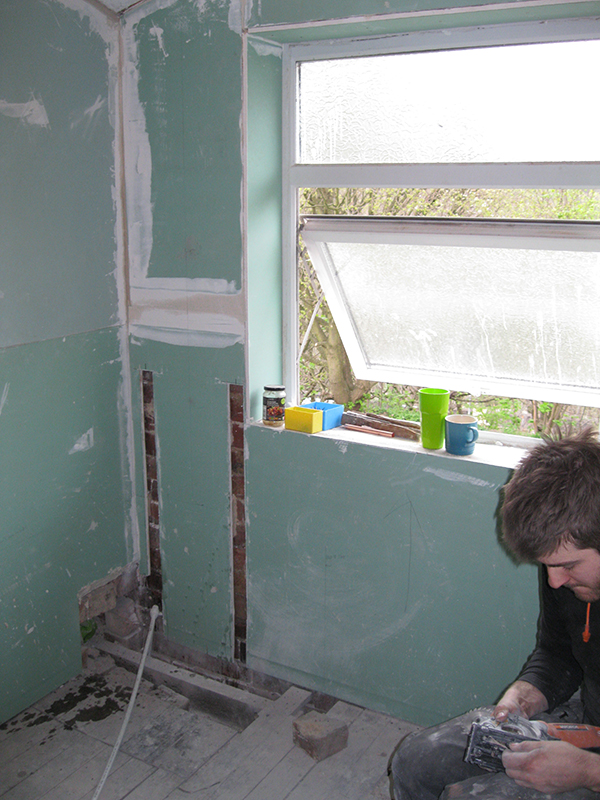
The tiles are then removed from the walls and the damage to the walls beneath the tiles is assessed – in this instance, the existing tiles were tiled onto walls that had been rendered and plastered, and the render was found to be ‘blown’. This meant that it no longer adhered effectively to the brick wall behind, and had to be removed in order for the next phase of the work to begin (see picture below).
Please see Preparing Walls for Tiling – Removing Tiles for more background information on this subject and the steps that are needed to do this.
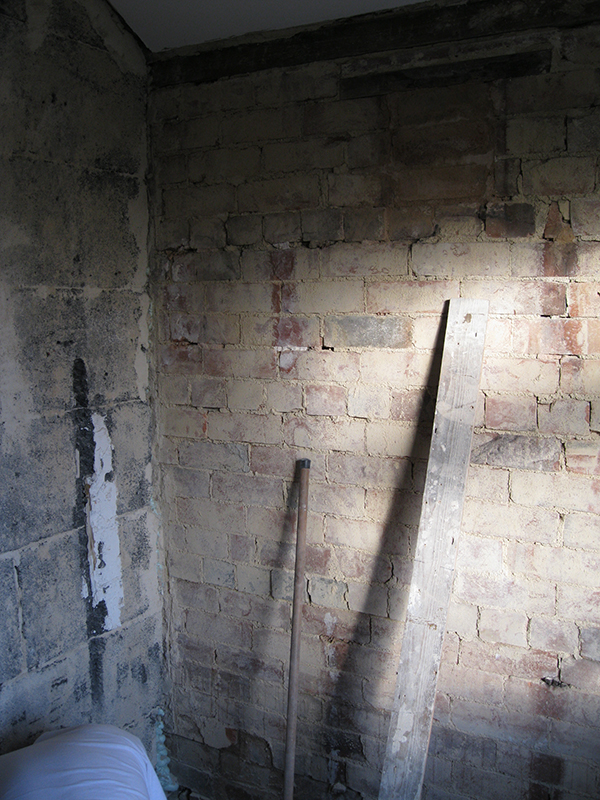
At this stage additional expanding foam insulation is added around the poorly fitted UPVC window frame to aid insulation and limit heat loss from the bathroom. For more tips on how to keep bathrooms warm see controlling bathroom humidity.
1st Fix Electrics
This stage involves running all of the cables that will power the items that are to be included in the new bathroom installation:
A switched fused spur is fitted to power the electric underfloor heating and a single back box is chased into the wall outside the bathroom to accommodate the new digital thermostat. A conduit is chased into the wall to feed the underfloor heating wire and temperature sensor wire through, allowing for easy replacement if the sensor is found to be defective prior to full installation.
Electrical cables are run and holes are drilled in the ceiling to accommodate new ceiling spotlights.
Electrical cables are also run to the position required for a new shaver socket, and a back box is chased into the wall in preparation.
A hole is drilled in the external wall to accommodate an extractor fan as part of an effort to reduce condensation and mould, and the necessary cables are run in the loft above. Provisions are made for an isolating switch to allow the end user to turn the fan off if required.
Wall preparation
Once the walls have been taken ‘back to brick’ and 1st fix electrics have been carried out, they are then re-boarded with water-resistant plasterboard using the ‘dot ‘n’ dab’ method as outlined in my article entitled Preparing walls for tiling – reboarding.
This technique is the quickest, easiest and cheapest way to get completely level, plumb, square walls when you are boarding a room from ‘back to brick.’
Top tip
When boarding out the room, check the internal wall corners are square (particularly at the level the shower tray or bath rim will sit) to ensure the tray or bath will sit snugly up to the walls enclosing it – this will help to produce a watertight seal around the bath when fitted correctly.
The wall where the shower will be placed is rendered with bonding plaster (instead of boarded – to ensure the bath fits into the available space in this example.) This is because rendering generally packs the wall out less than ‘dotting ‘n’ dabbing’ and this is important on walls where door frames/architrave make this approach unfeasible.
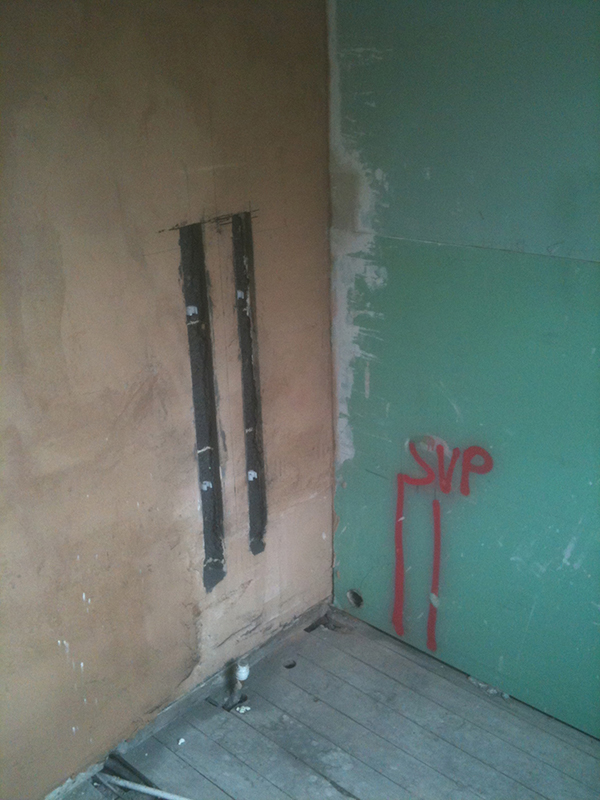
At this point, channels are chased out in the blockwork to run the hot & cold pipes to the shower, and in the plasterboard to run pipework to the new towel radiator as can be seen above. Extra drywall adhesive is packed around the new chased channel in the plasterboard to ensure that the board edges are supported.
Top tip
It is easier to get completely level, plumb, square walls before chasing out for the pipework rather than chasing these out 1st and then trying to level up the wall around the pipes.
Now is a good time to paint the ceiling, as you will not splatter the bath or any tiles with your paint roller – you also don’t have to carefully cut in at the edges as you would if you carried out this process after tiling the walls.
1st Fix Plumbing
This stage involves running new supply pipework to (and waste pipework from) the intended position of the new suite items.
Supply pipework carries hot and cold water to the thermostatic mixer shower, bath filler, basin mixer tap and (cold water only) to the toilet in this example.
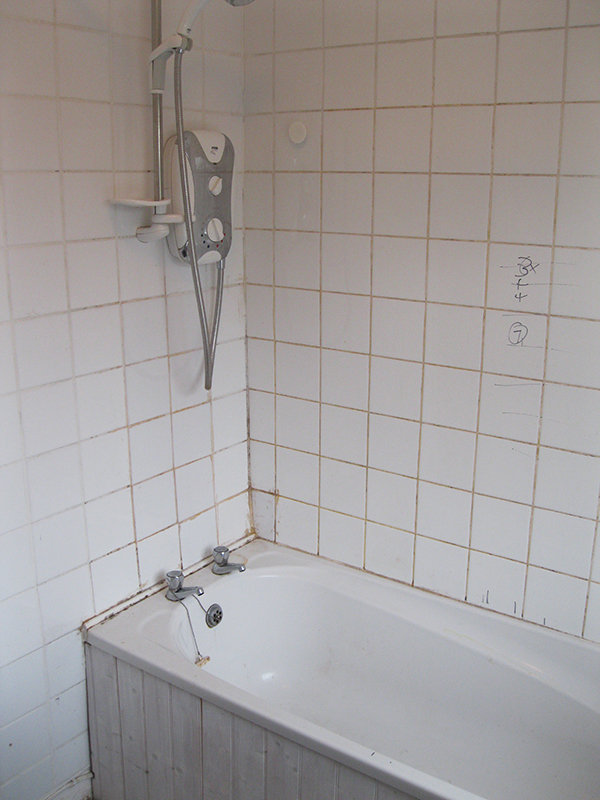
Water is transported through 15/22mm copper or plastic pipes which are run under the floorboards (in-between & through the joists where required) to avoid unsightly boxing in associated with running pipework above floor level – see picture of the original bathroom at the beginning of this article.
Supply pipework feeding the shower and bath filler is run above the floorboards under the bath, making future access easier should maintenance be required.
Provisions are also made for the pipes to take the wastewater away from the bath/shower, basin & toilet (known as waste pipes.) These need to carry wastewater from the toilet (4-inch diameter pipe) into the soil vent pipe (which is normally located on the outside of the house) and wastewater from the bath/shower (1½ inch diameter pipe) and basin (1¼ inch diameter pipe) into either the soil vent pipe or a rainwater hopper depending on the drainage options available. Note in the picture above how the soil vent pipe is marked on the wall internally to ensure the bath waste hole is drilled in an appropriate position.
In this instance, a new hole was drilled for the bath waste as the new bath had the waste at one end, whereas the existing bath’s waste was in the centre. This meant that the old hole needed to be blocked up with mortar – this was done before re-boarding the walls in this example.
As the toilet is being replaced in the same position, the point where the soil pipe enters the bathroom does not have to be altered, so no new holes have to be drilled – this saves a lot of time and money.
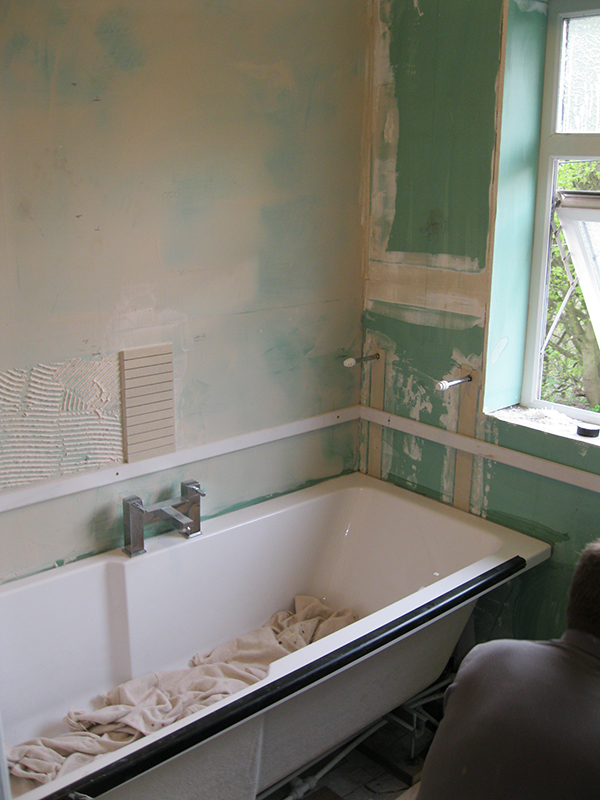
The bath taps are fitted to the bath prior to installation, as is the pop-up bath waste and trap.
Baths and/or shower trays are installed at 1st fix stage as they need to be fitted prior to the commencement of tiling. This is essential to get professional watertight seals, as water ingress resulting from doing things in the wrong order can cause massive problems later on. See www.howtofitabath.co.uk for more information.
At this time the central heating pipework also needs to be relocated to accommodate the new position of the new towel warmer over the bath. This involves draining down the central heating system before refilling it after the pipework has been completed to check for leaks.
Only after all pipework has been tested for leaks can the floorboards go back down and the following can be done:
All pipework that has been chased into the wall is secured in place with clips and then drywall adhesive or a sand & cement mix, ensuring that they are first wrapped in an impermeable tape to protect the copper from chemical attack. This ensures that the pipes will be held in the correct place and reinstates a flat surface that can later be tiled on.
Wall tiling
Firstly, the walls around the bath are tanked (made fully waterproof) using a tanking kit to ensure no water can penetrate into the wall and cause any problems associated with water ingress behind tiles. Please see Preparing Walls for Tiling – Removing Tiles for more information on tanking kits.
Top tip
When tiling a bathroom ‘floor to ceiling’ there is no point in plastering out the boards prior to tiling. In fact, it will reduce the amount of tile weight the plasterboard will hold, and it is advisable to leave fresh plaster to dry for 4 weeks before tiling, ensuring you a very long wait!
Next, we plan out the tile layout to ensure that the finished pattern looks balanced and we are not left with any awkward or unnecessarily small cuts. Please see my article Marking Out for Wall Tiling for more tips on this subject as a little time spent at this stage can save you a lot of time and hassle later on.
When the horizontal and vertical axis have been worked out, a horizontal baton spanning the entire perimeter of the room is attached to the wall.
It is imperative that this baton is completely level and half an hour levelling this up accurately will save you half a day of tiling, and make a professional finish a lot more achievable. Then tiling can begin.
Once the tiles are adhered to the plasterboard above the baton all the way around the room, the window reveals can then be tiled.

As the wall tiles need to finish ‘down’ onto the floor tiles for a neat, watertight finish, I leave fixing the wall tiles below the baton until after the floor tiles have been fitted.
Floor tiling
The floor is then prepared for tiling and then tiled. Please see my articles on Tiling on wooden floors – preparation and Tiling on wooden floors – tiling for more details on how this can be done.
After the floor has been over-boarded, the underfloor heating cable can be laid out – this essentially involves sticking the heating cable and temperature probe down to the tile backer boards.
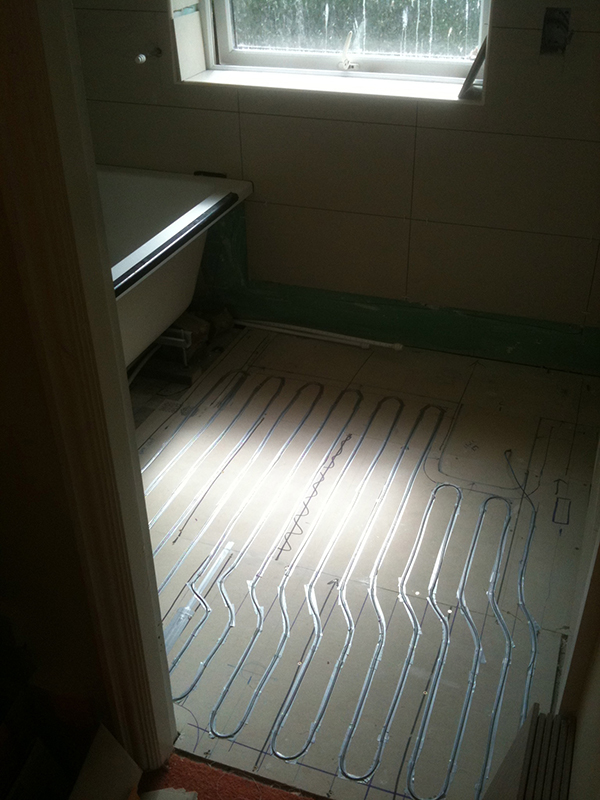
It is important to test the heating cable at this point to ensure that it actually works. The last thing you want is to effectively bury a defective heating cable underneath your tiles, which would then have to be removed if you discovered that the heating element didn’t actually work.
After the floor tiles are laid (and the adhesive has set) the remaining wall tiles can be fitted.
When all tiling has been completed, and the adhesive has fully cured the tiles can be grouted.
After grouting and tile polishing, all necessary corners can be sealed with silicon e.g. around the bath rim and wall/floor junctions etc. Please see how to silicon for my tips on the trade on accomplishing this potentially messy task.
2nd Fix Electrics
This stage involves fitting the items that are to be included in the new bathroom installation:
- The underfloor heating thermostat
- The ceiling spotlights and associated pull-cord
- The shaver socket
- The extractor fan and isolating switch
Joinery
In this particular bathroom installation, the door was rehung on the other side of the frame to give the users more space upon entering the bathroom.
This was considered from the outset and lighting pull-cords were positioned accordingly.
The vanity unit was also assembled and fitted to the wall ready for the plumber.
2nd Fix Plumbing
This stage involved the fitting / plumbing in the following items:
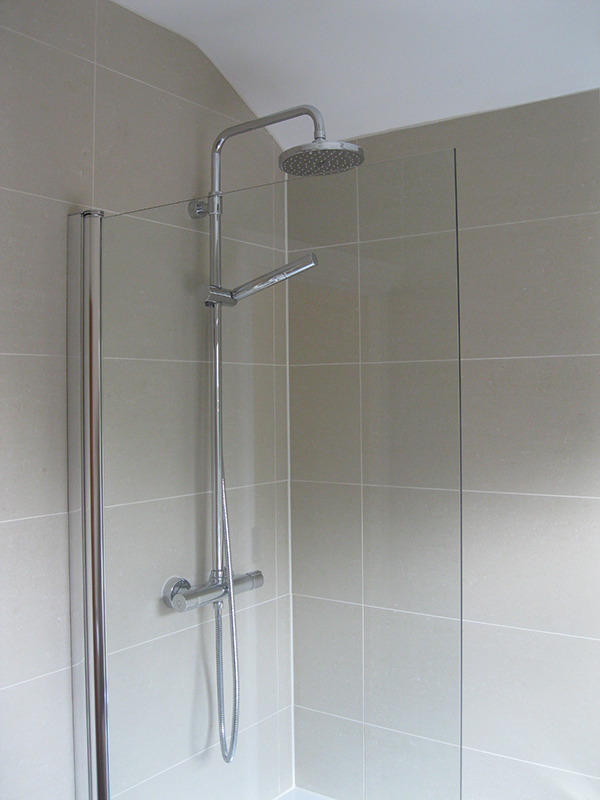
- The thermostatic shower onto the hot & cold feeds protruding from the wall
- The bath screen
- The toilet cistern and back to wall pan & soft close seat
- The basin and basin mixer tap
Finishing touches
The following items were then fitted to finish off:
- Venetian blind
- Toilet roll holder
- Cabinet
Time taken – 1.5 weeks for ukbathroomguru
If you would like a free quote, please contact me.
Chris.